Posts Tagged ‘cazuela’

Low Carb Easy: The Clay Pot Bake

image

When I’m having special friends over for dinner and want to have plenty of time for serious conversation, my favorite weapon is a 14″ Spanish cazuela that I got at a Spanish import store many years ago. Any large clay baking pan would do just as well. The idea is to be able to roast chicken and vegetables together in chosen seasonings and have a veggie-rich low-carb meal come out of one pan without a lot of fuss, and be able to bring the baking dish straight to the table fairly attractively. Dark meat of chicken is ideal for a “mixed bake,” and if you don’t grow your own, get the best pastured chicken that you can lay hands on.

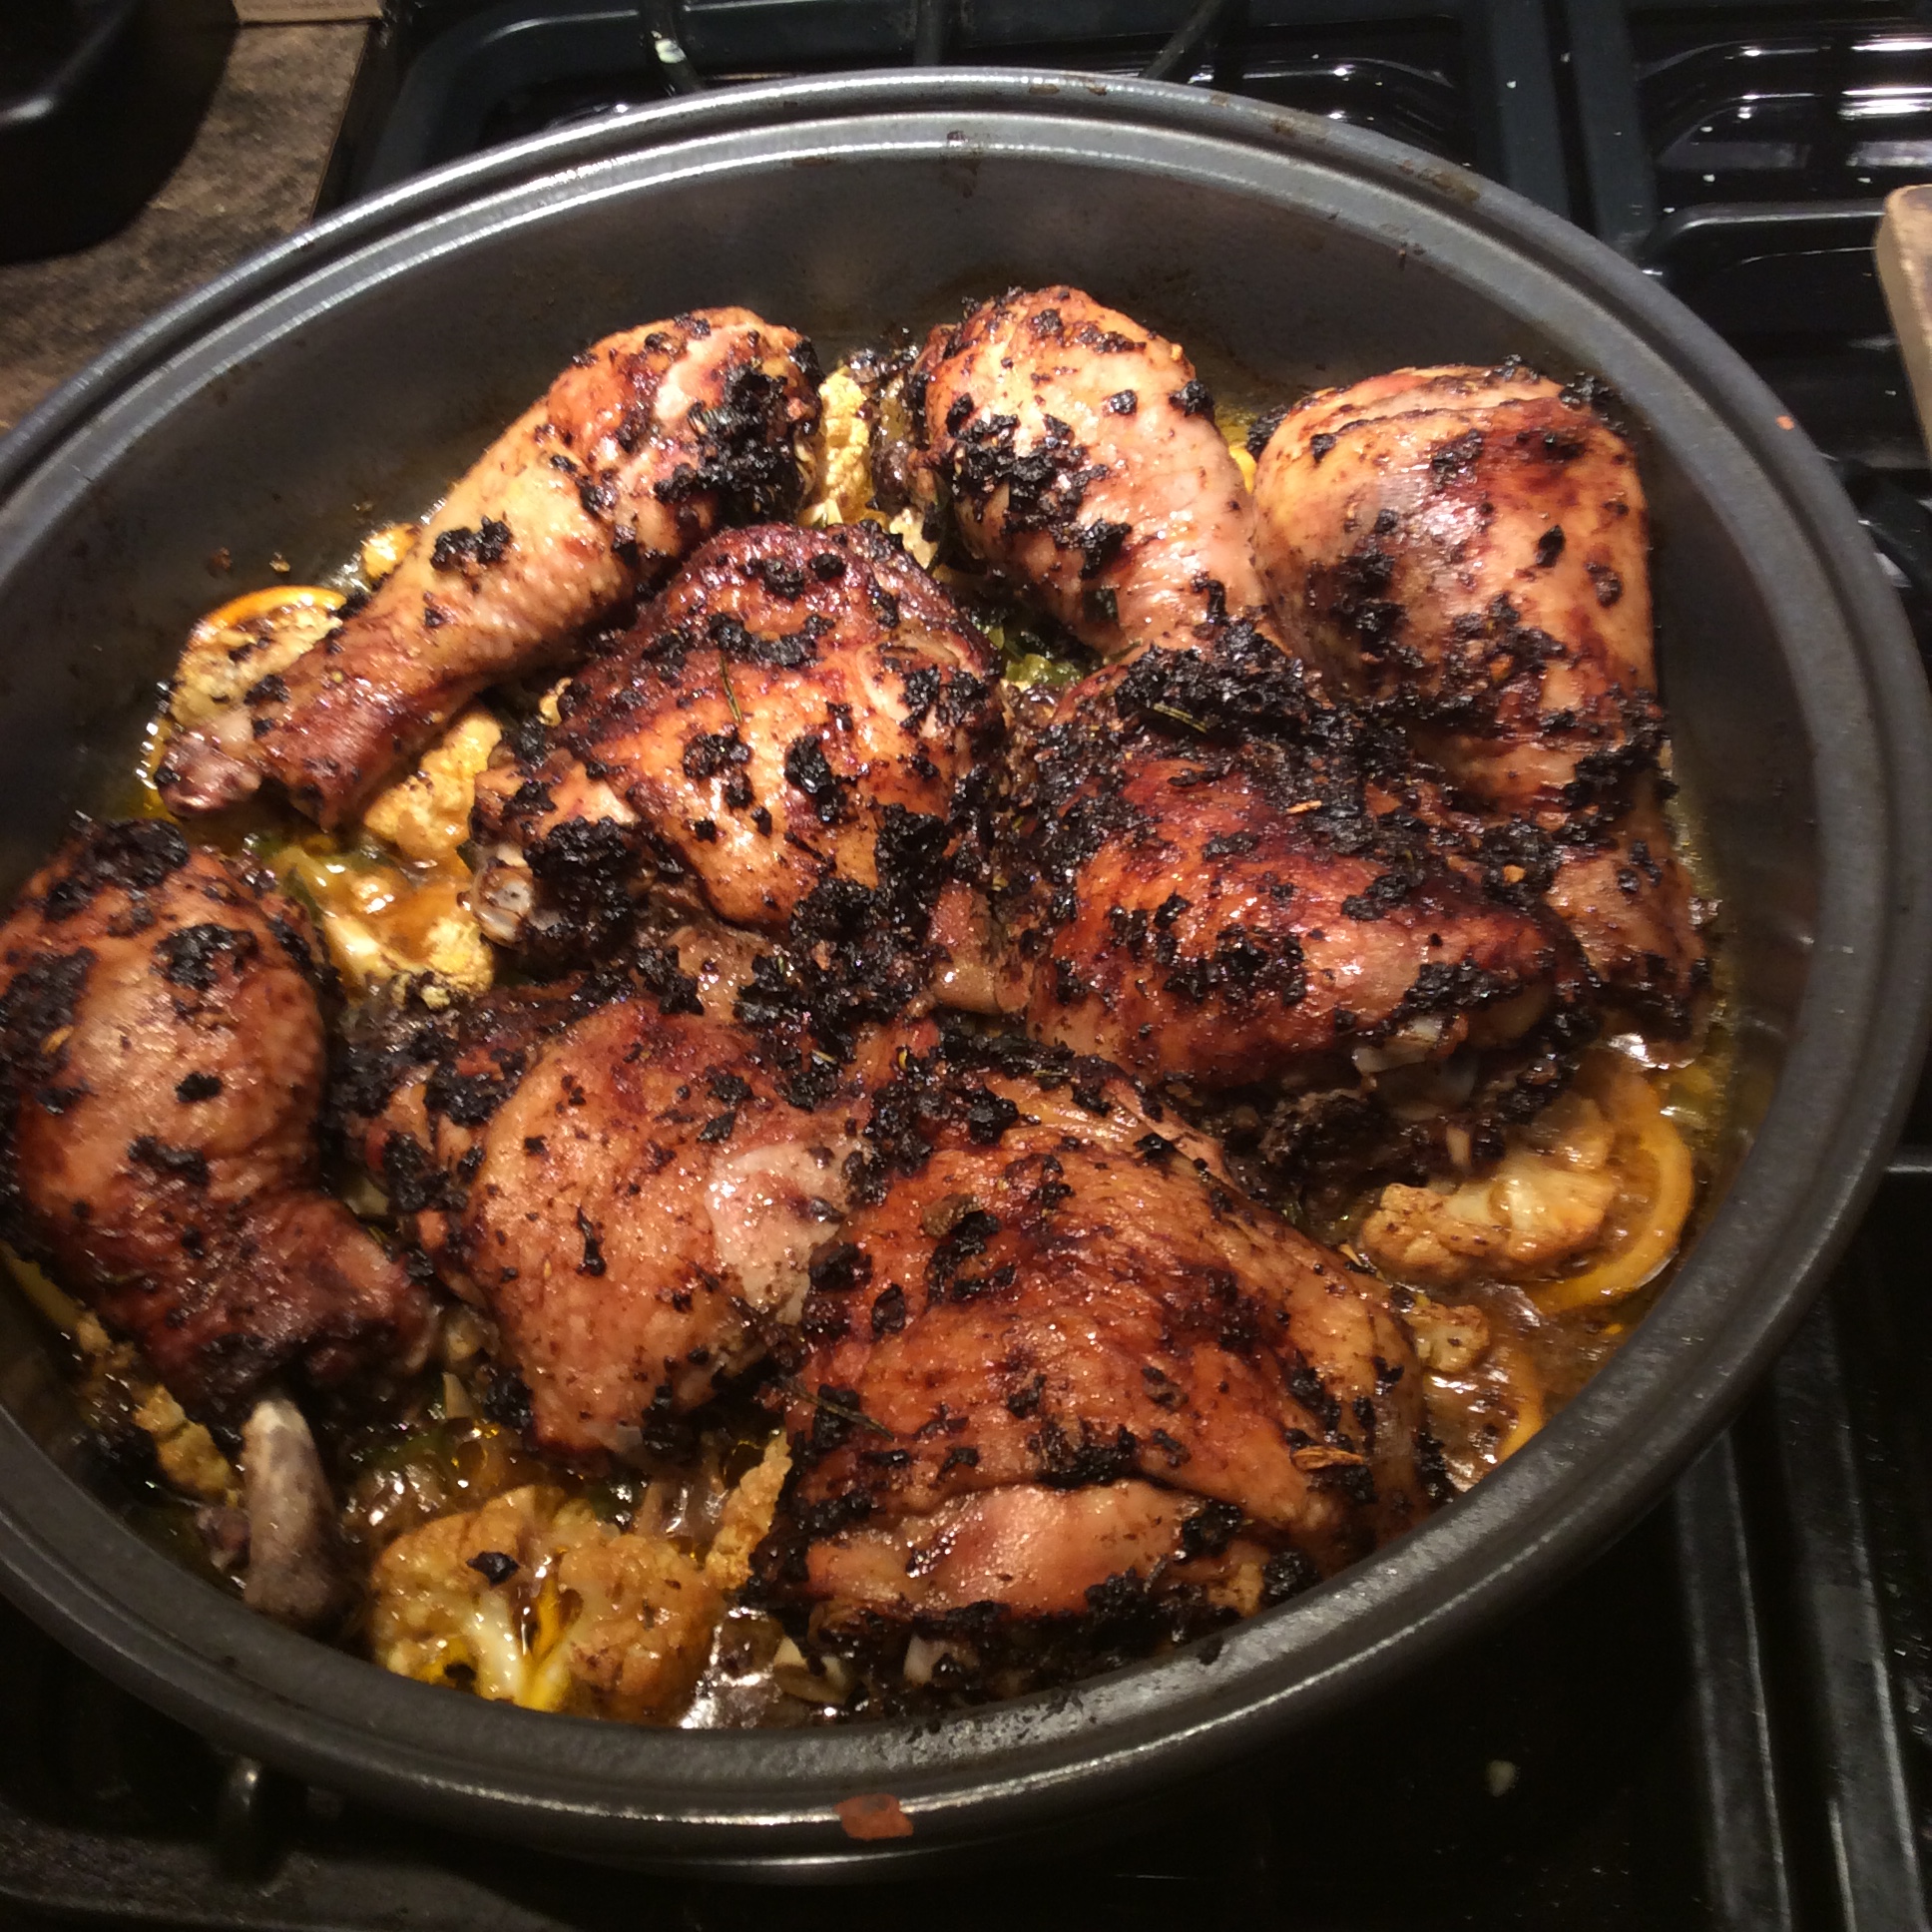
Decide on your seasonings. One of my favorites is a loose paste of a few cloves of garlic, about half a cup of oil-cured black olives, a little salt ( half a teaspoon or so, since the olives are pretty salty,) a sprig of rosemary chopped, the juice of half a lemon, and enough olive oil to form a runny paste in the food processor. Work this paste over eight pieces of chicken thighs and legs and set them in the refrigerator overnight.

Then choose your vegetables. A head of cauliflower cut into florets is top of the list for me because it takes up the seasonings so beautifully. Leave out all the stemmy center, which is a nice break for your backyard goat. I always add a cup of thickly sliced celery and a lemon sliced thin, peel and all. You can put in 7-8 chopped stalks of green garlic at this time, or if you already have some cooked green garlic in the refrigerator, it can go in later with the chicken. Have your veggies prepped in a bag in the refrigerator.

image

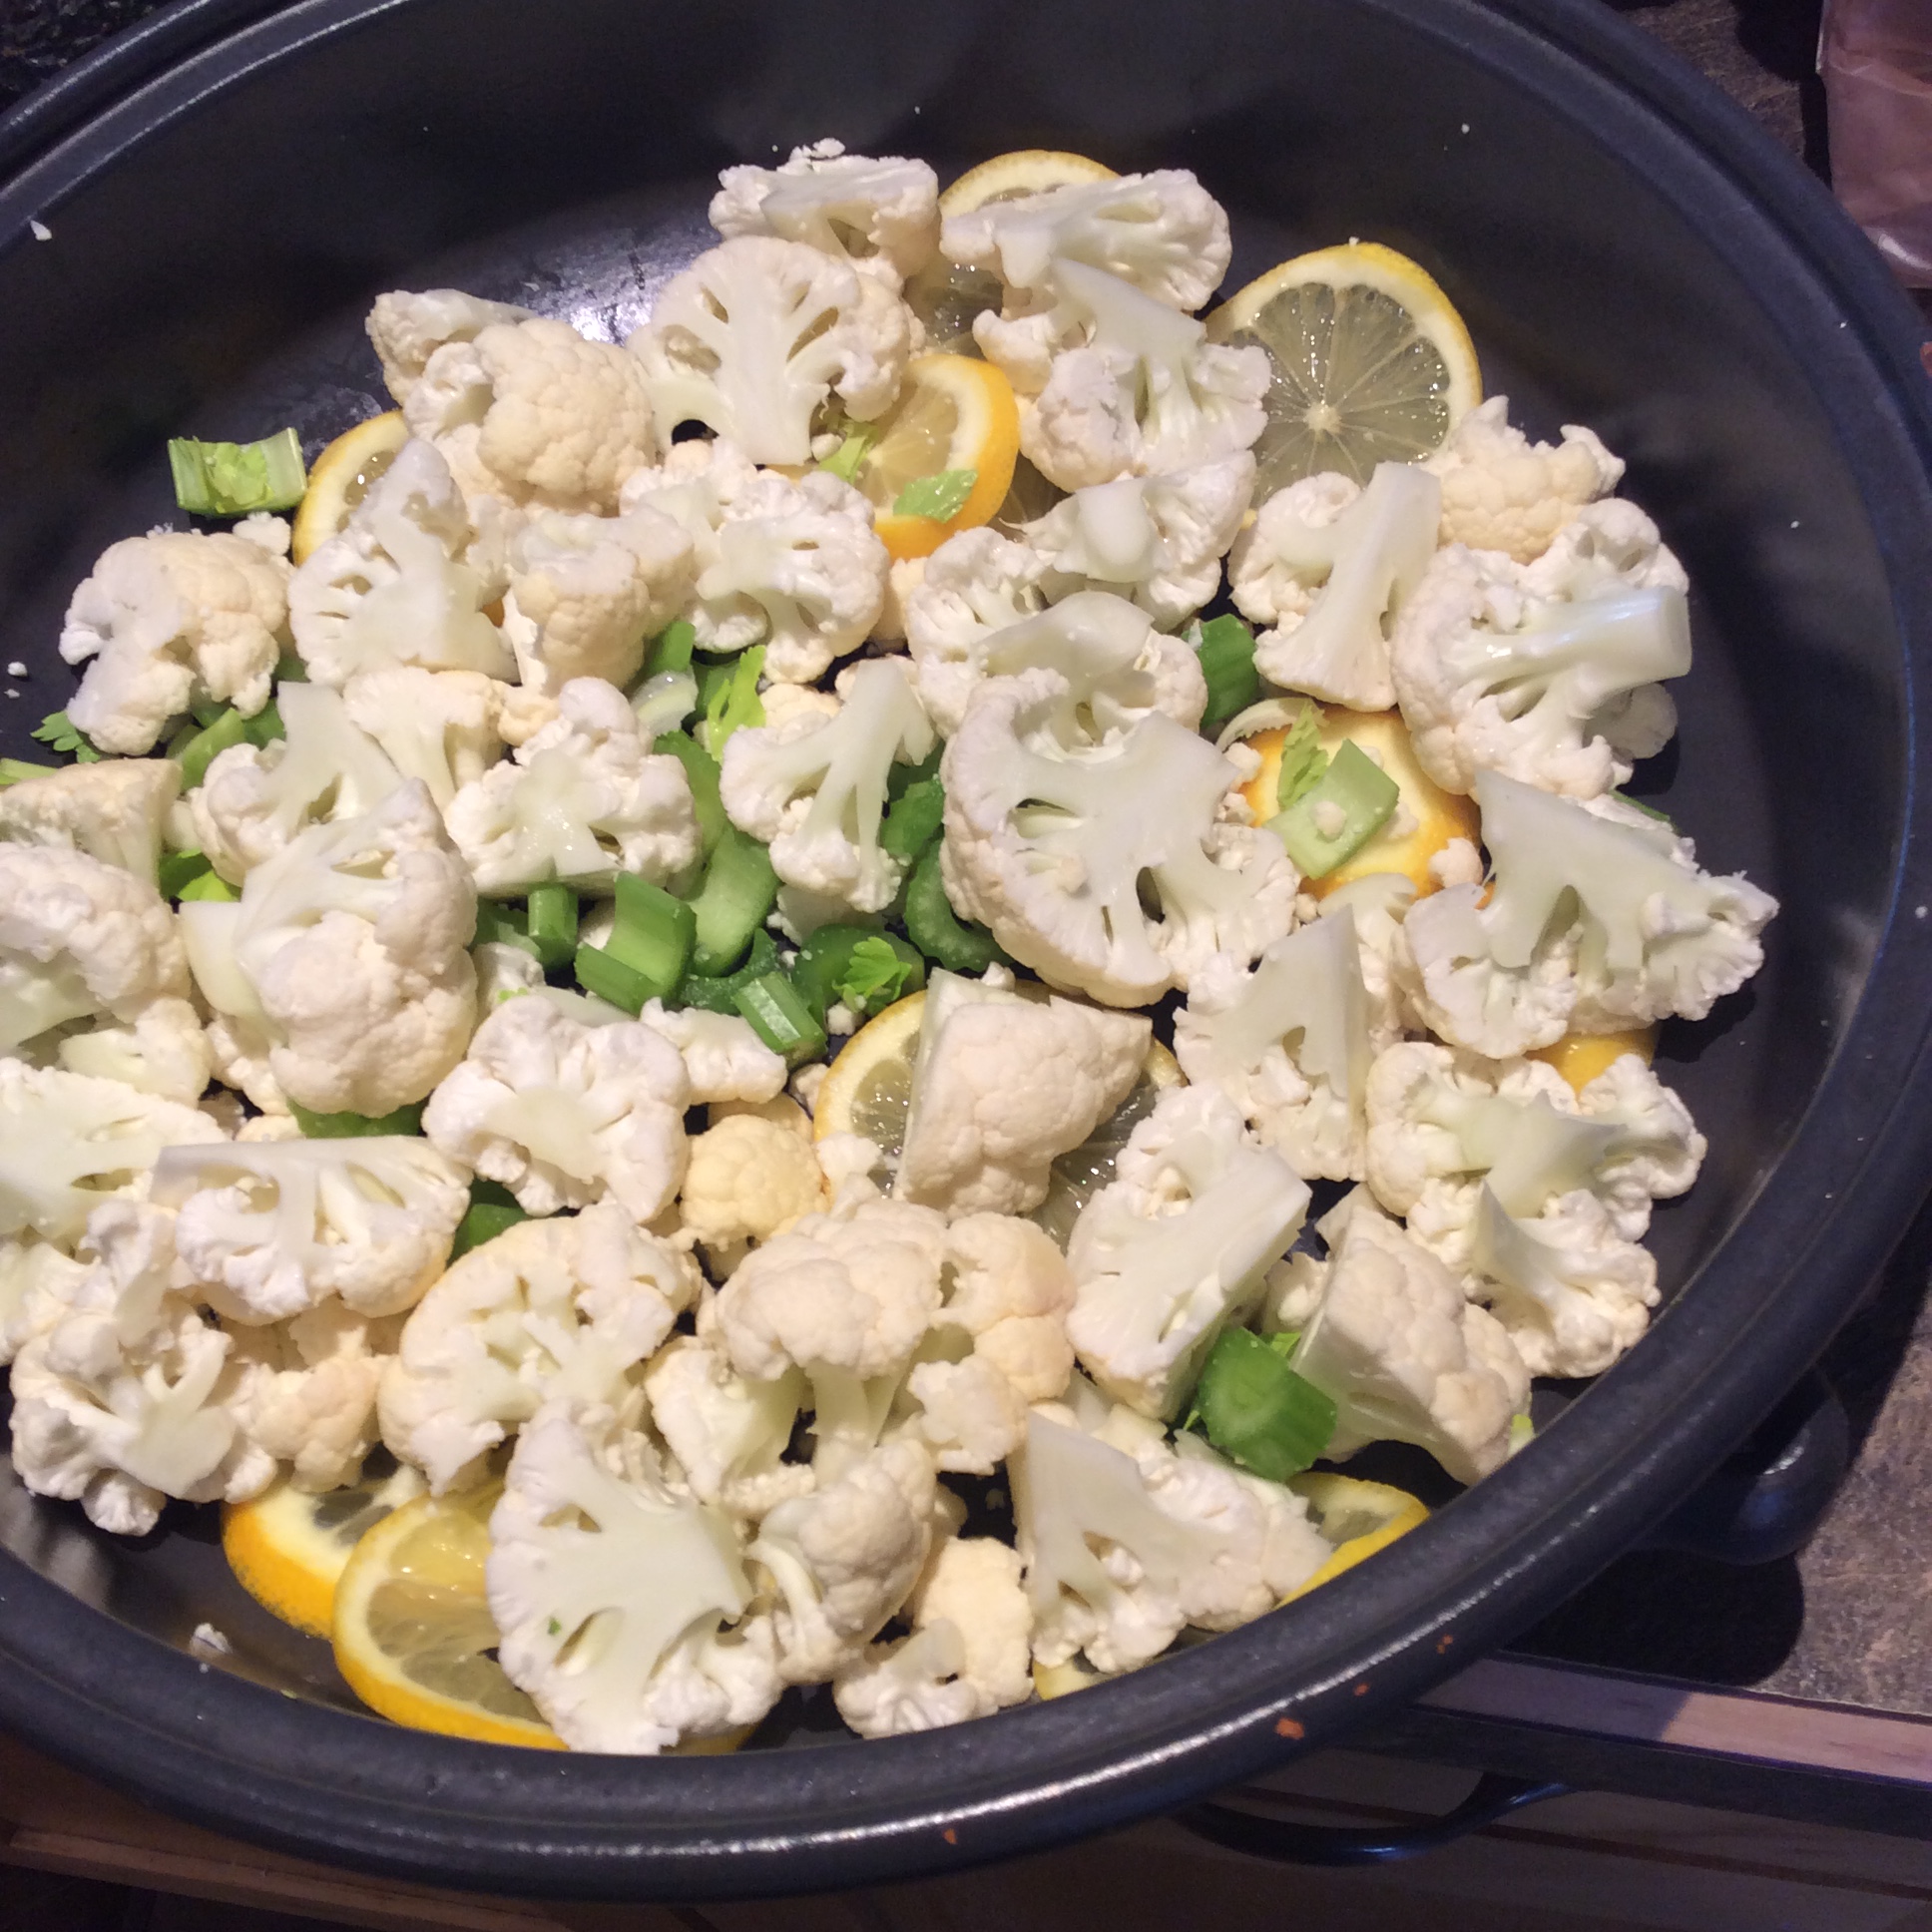
About forty-five minutes before you want to serve, preheat your oven to 425. Spread the lemon slices in the bottom of the dish and put the other veggies on top. Sprinkle lightly with salt but for the most part they will be seasoned by the chicken. Stick in the oven and roast about 20 minutes. Meanwhile, enjoy some wine and nuts or other nibble with your company. Pull the pan out and arrange the chicken on top of the veggies skin side up. If you like (and I do,) you can also add several stalks’ worth of green garlic at this time before putting in the chicken if you have green garlic waiting, pre-sautéed, in the refrigerator. Glop any remaining seasoning paste on top and pour in about half a cup of rich chicken broth to prevent burning.  Return to the oven and roast until the chicken is done, put the pan on a trivet on the table, provide a large serving spoon and a pepper mill, and eat. That’s all there is to it.

image

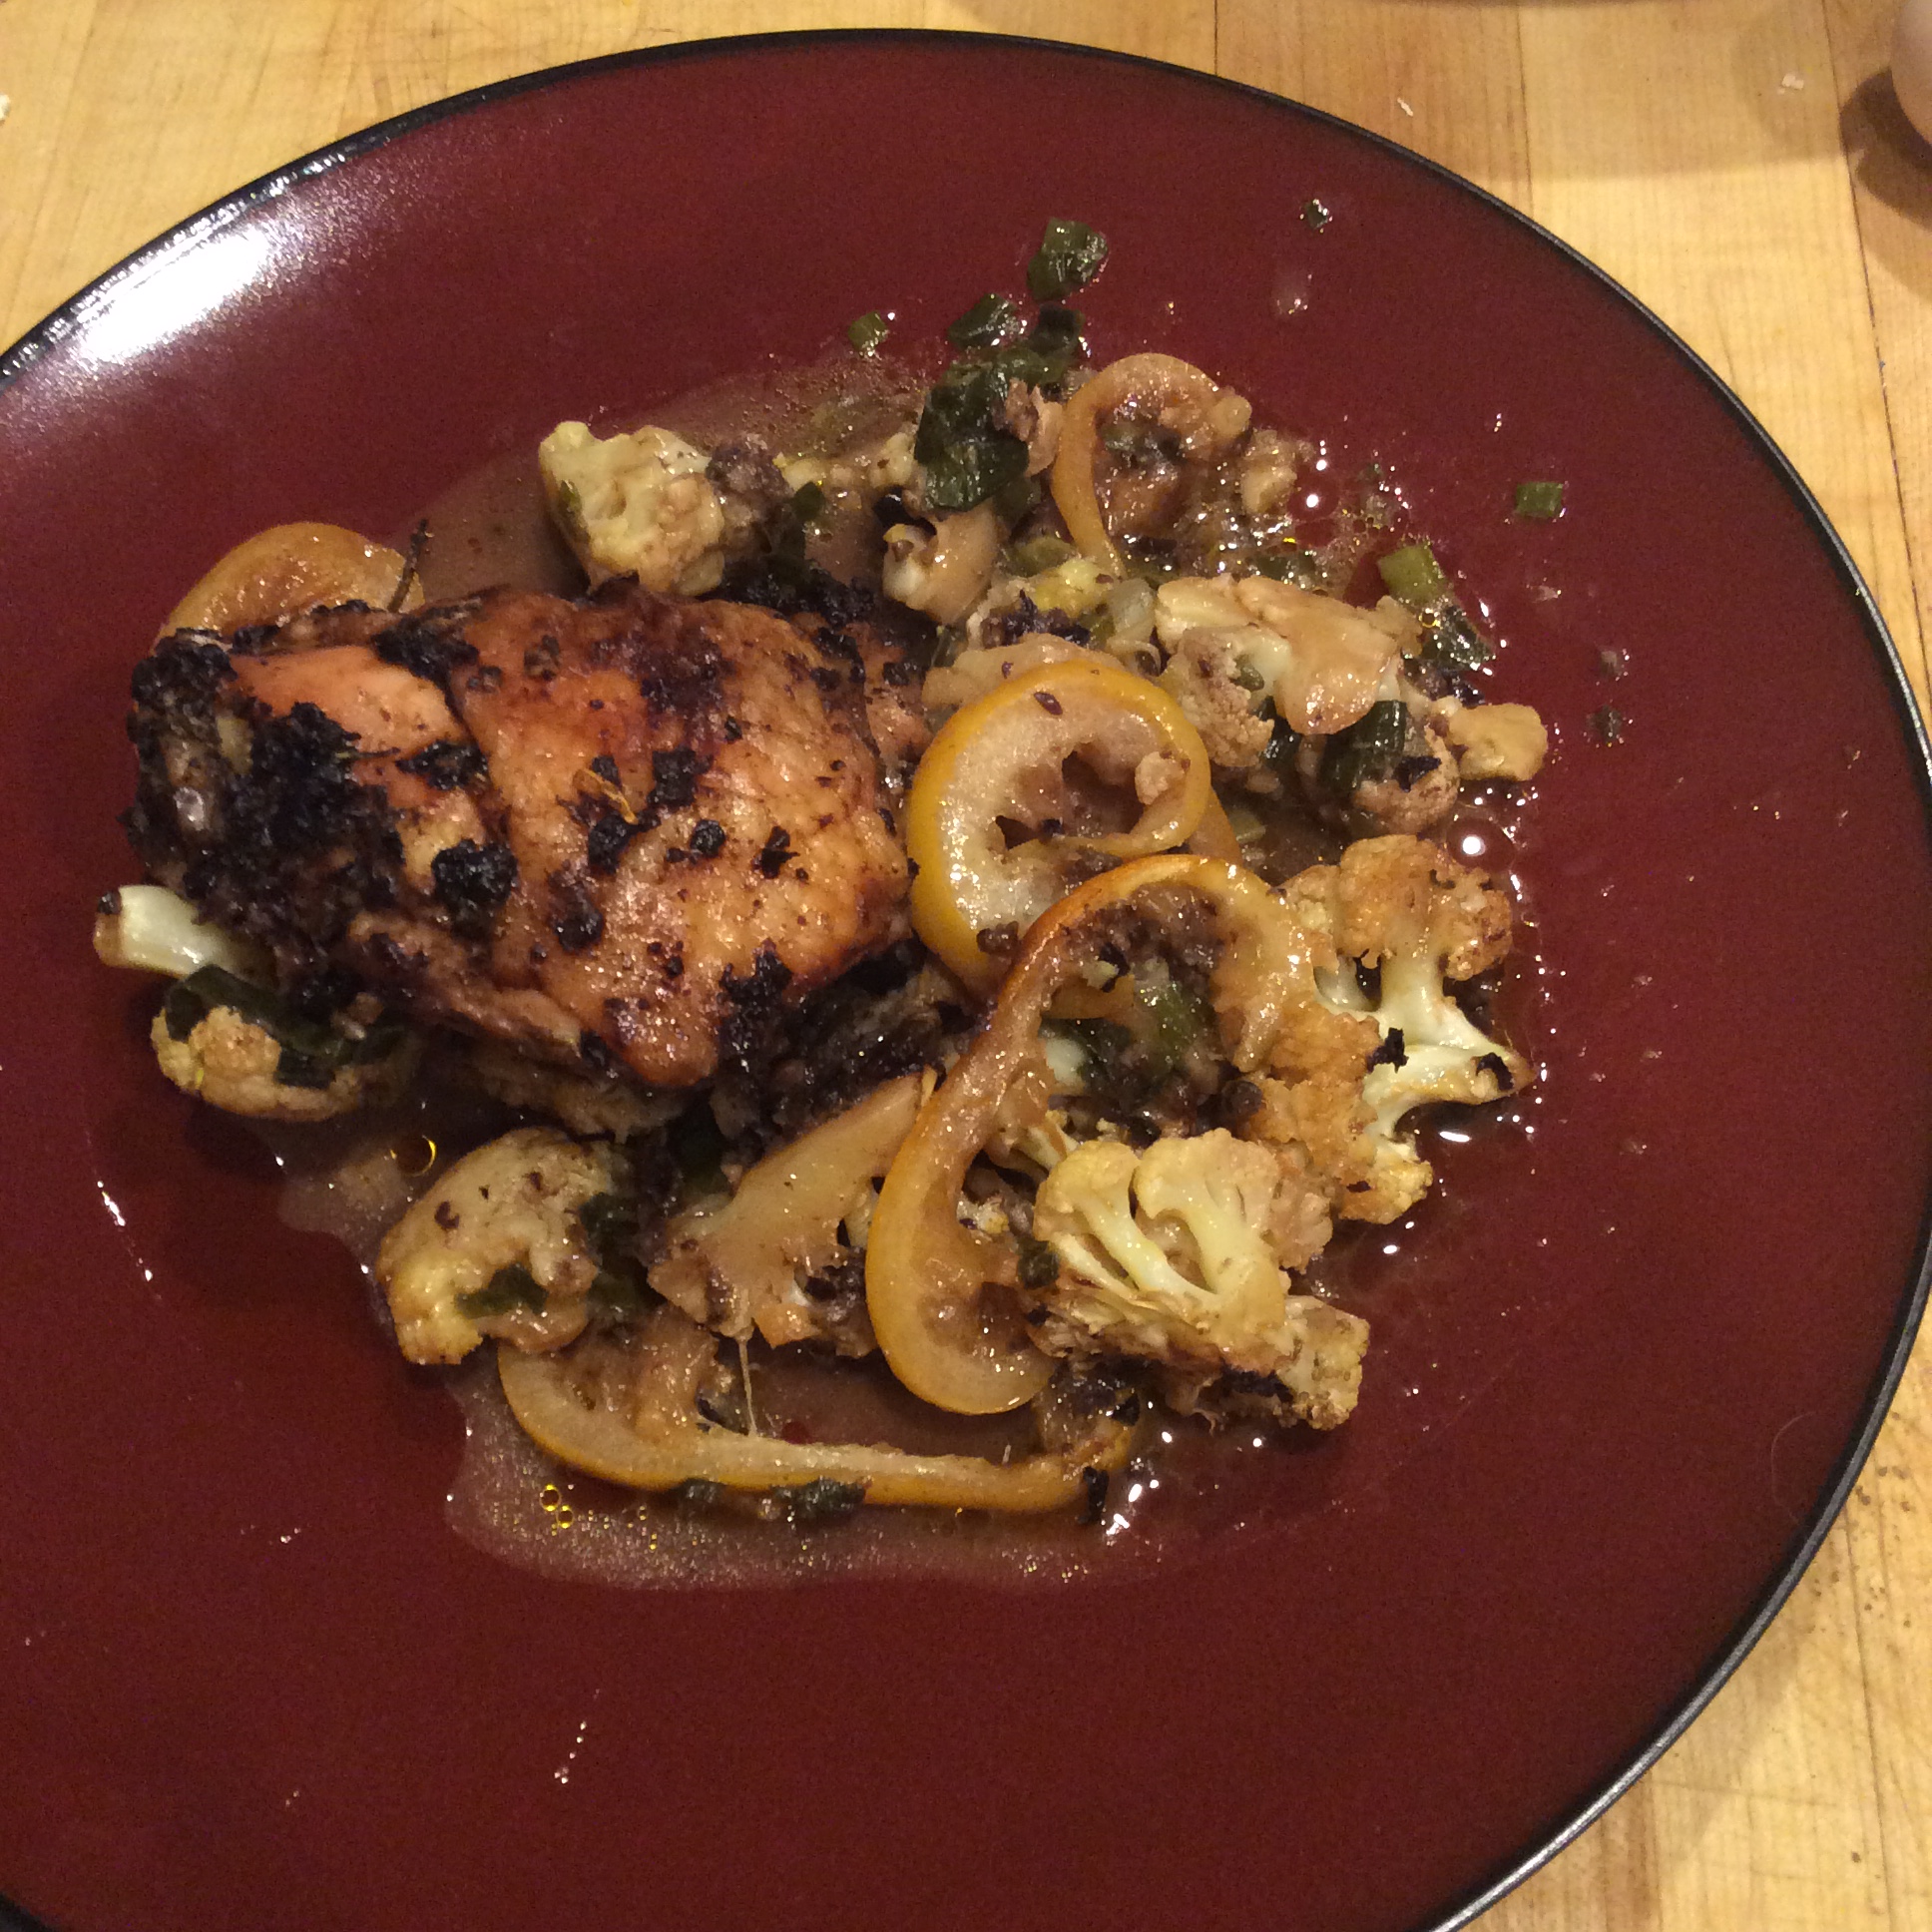
I find the softened, slightly caramelized lemon truly delicious and include a bit of it in each bite, but dubious guests can shove it to the side of their plate if they prefer and still get the flavor. I only suggest doing this with organic lemons.

Even people who don’t usually eat low-carb will find this a satisfying meal, but you can provide some toasted sourdough bread if you want to make sure.

Berries or dark chocolate or both make a good finish.

Root vegetables Chairoscuro


This time of year, parsnips are your friends. They are sitting patiently out in the garden waiting for you to get to them, never demanding any special attention or winter storage. During hot weather they weren’t worth eating and you tended to forget about them, but while you were catering to the flighty tomatoes and peppers, they were biding their time. When the needier vegetables gave in to the frosts, they started to convert their stored starches to sugars. Now, whenever you can pry them out of the cold ground, they’re ready to meet you halfway with a sweet flavor that repays your labor. I love them roasted, but for whatever reason I’m not big on white vegetables, and I started looking for something to relieve their snowy monotony. Finally I settled on their visual opposite, the deep purple carrots that become almost black when roasted, to create a dish with a little drama.
Clean two big parsnips and cut them into chunks no more than an inch on any side. Thoroughly scrub 3 large purple carrots and cut them into chunks somewhat smaller than the parsnips. Combine a quarter cup of good olive oil, a few tablespoons of white wine, half a teaspoon of salt or to taste, and two cloves of chopped garlic. Now this part is important: Put the carrots and the parsnips in two separate bowls and toss each with half the olive oil mixture. Don’t toss them together, because the carrots will “bleed” and stain the parsnips an unattractive magenta in places. If you are using regular orange carrots, separation doesn’t matter. Put the pieces in a cazuela big enough to hold them in one layer, or use a 9X13 heavy pan lined with parchment paper. Roast at 325. Don’t toss them around during roasting, because of the staining problem from the anthocyanins in purple carrots. The timing will vary a lot depending on the tender/tough ratio of the roots and on your personal taste. I like winter root vegetables roasted until they are soft and well caramelized, and it usually takes close to 2 hours at this low heat. If you like yours with some crunch you can stop cooking them sooner, but taste them before turning the oven off. These are not the tender roots of summer, they’re big meaty winter roots, and you may not like the amount of crunch they retain. If necessary, cook longer. Sprinkle a little bit of minced parsley over the top. If you want to be sure they’re done in time for dinner, cook them a little earlier in the day and leave them slightly underdone, then return to the oven for a final 20 minutes before dinner.

A big serving of these “white and black” roots on a red plate makes a great main course with a little piece of something meaty in the center. A few thighs of good pastured chicken seasoned with thyme, garlic, and olive oil can be roasted in the same oven for the last hour or so of cooking and will accent the roots nicely without overwhelming their flavors.

Cooking in Clay: cazuela apple crisp


In my new home my apple trees are infants about five feet high, but the day will come when I’m eating apples from my own trees, all heirlooms chosen for superb flavor. In the meantime the farmers’ markets are full of apples, and in a moment of impulse I bought an enormous bag of Winesaps. After eating all that I could fresh, I indulged my passion for fruit crisps. Desserts are seldom justifiable on purely nutritional grounds, but this one is a lot healthier than most, particularly because the peel is left on the apples. Try it. As long as you follow the directions, the peel won’t bother you a bit, and it adds fiber and antioxidants and saves time. Use organic, unwaxed apples. Ask to taste them first, because any apple is affected by its immediate conditions and the season. Don’t ever bother cooking with an insipid or mealy apple. Your time and effort will not be rewarded.

I strongly advise cooking in a clay pan for best flavor. I keep a 10″ Spanish cazuela from The Spanish Table in Santa Fe, and find that it’s the most used pan in my kitchen, because I can use it on the stovetop or in the oven. I strongly advise reading Paula Wolfert’s “Mediterranean Clay Pot Cooking” for the ins and outs of using clay pots. Season the cazuela according to the directions that come with it, and follow the temperature and timing directions below closely. This dessert takes a few hours to make, but 90% or more of the time is unattended oven-cooking time, so you’ll get a lot of other things done at the same time.

The whole beauty of this dessert is the pure flavor of the slow-cooked, semicaramelized apples, made a little richer by the vanilla. I definitely don’t recommend adding spices.
You will need:
a seasoned 10″ cazuela
Fruit layer:
8 large flavorful apples such as Winesap or Granny Smith, each at least 3″ in diameter, or a dozen or more smaller apples
juice of half a small lemon
1/2 cup (or more) light agave nectar
2 tablespoons cornstarch
2 teaspoons vanilla
a pinch of salt
Crisp layer:
1 cup rolled oats
1 cup unbleached flour
1/2 cup sugar
8 tablespoons good grass-fed butter
2 teaspoons vanilla
1/2 teaspoon salt
l
Wash, halve, and core the apples, then slice into very thin slices lengthwise. Aim for slices 1/8″ thick, but if a few are a little thicker it won’t matter much. A food processor or mandoline is helpful, but I just use a good sharp knife. Don’t leave any really thick slices in, because the peels will be tough in the finished dessert, while very thin slices of peel become unnoticeable during the long slow cooking. In a large bowl, toss the apple slices with the cornstarch, lemon juice, agave nectar, vanilla, and salt. Pile them into the cazuela. They will probably have to be stacked up a little inn order to fit. Don’t worry, they cook down a lot. Pop the cazuela in the oven, set it for 300 degrees, and bake about 90 minutes. Stir once or twice during that time. If the apples seem to be browning on the bottom, turn the oven down some and stir a little more frequently.

To make the topping, combine the oats, flour, salt, and sugar in a bowl. Cut the cold butter in chunks, then work it into the mixture with your fingers, making sure that it is “smooshed” well into the dry ingredients and no large chunks remain. Toss in the vanilla with a fork, then check the baking apples. After about 90 minutes they should be well cooked down. Pile the crumble mixture on top, return to the slow oven, and bake another hour. At that point you can turn up the heat to brown the top a little, or turn on the broiler for a minute or two, but don’t let it get darker than medium gold and watch carefully to avoid burning. Remove from the oven, let cool a little, and serve with vanilla ice cream on top, or cool it completely to rewarm at another time. It keeps at least a few days.

The desert is not terribly sweet, and I love it that way. If you prefer, you can add a little more sweetener to both the apple mixture and the topping. This topping is very crumbly and crispy. If you want something more like a cake topping, you can add an egg and a little milk and a pinch of baking powder to the dry mixture, but keep it on the dry clumpy side and don’t stir it too much, or you’ll develop the gluten in the flour and make it tough. This version doesn’t reheat nearly as well as the crumbly version.
Viva Fall! I love summer and hate to see it go, but the end of the harvest season has its own pleasures. Besides, it inspires me to dig more planting holes for more apple trees next spring.

The Greens of Summer: greens bruschetta

If you’re interested in making leafy greens an enjoyable part of your diet, I highly recommend Paula Wolfert’s book Mediterranean Grains and Greens. My favorite greens recipe, however, does not come from that book but from another of her books, Paul Wolfert’s World of Food. She calls it “marmalade of spring greens,” and it is intended as a spread for bread. I find it wonderful stuff to have tucked in the refrigerator, where it will keep for several days and makes great impromptu lunches and snacks. I have made it so often for so long that my recipe has morphed into something a little different from hers, as tends to happen with recipes that really work for me.

First, catch your greens. See my earlier blog post about greens options and about cleaning them. Right now I am mostly using mixtures of amaranth leaves ( the polite term for common pigweed), lambs quarters, purslane, sweet potato leaves, and New Zealand spinach, because those are the plants that are doing best in our summer heat. Gather about a pound of assorted greens. If you are using store bought, a mixture of Swiss chard or Tuscan kale and spinach will work well. I avoid the baby spinach that comes in cello bags. It doesn’t have enough flavor for use as a cooked green. If you enjoy bitter greens you can add several dandelion leaves (I am referring to the store bought kind, not the wild kind, which are too bitter to use at this time of year.) Or you can add a small bunch of watercress to add a little bit of snap. But don’t worry too much about this, because the seasonings will add the extra kick as long as the greens are good.

1 pound of mixed greens

One Shallot

Two cloves of garlic, fairly large

1/4 cup of olive oil

10 to 12 kalameta olives, finely chopped

2 tablespoons capers, preferably salt packed, washed of salt and soaked in cold water for an hour

Pinch of red pepper flakes

Salt and pepper to taste

Bring a pot of water to a boil, add the greens, and cook uncovered for one minute, just until they are thoroughly wilted. Drain and press out any excess moisture. Turn them out on the chopping board and chop them thoroughly in both directions, so that you retain some texture (you don’t want a paste) but all stems and leaf ribs are cut up into small pieces.

Chop the garlic and shallot quite finely over medium heat in the olive oil until cooked through but not brown. Add the chopped olives and the capers, either chopped or whole as you prefer. Sauté for a few minutes, then add the chopped greens, the red pepper, and a little salt. Cook over low heat, stirring occasionally, for about 15 minutes or until the greens are tender. Taste, season with salt and pepper as needed, and spread thickly on toasted or grilled bread. Top with some grated Parmesan cheese and a handful of toasted pine nuts.

Many variations are possible, and I seldom make this dish the same way twice. I may add several cloves of confited garlic instead of two cloves of fresh for a deep mellow flavor. A mashed filet of anchovy or a dash of colatura added at the saute’ stage give an especially rich flavor- this is very close to the Wolfert original. A generous spoonful of roasted tomato sauce added toward the beginning is a nice touch. A half teaspoon of Spanish smoked paprika, Pimenton de la Vera, gives a faint smoky edge as if you had cooked it over a wood fire.  A good sprinkling of fresh thyme or chopped oregano or marjoram leaves over the top just before serving gives a lovely whiff of its Mediterranean origin.  A poached or fried egg plopped on top makes it a hearty meal. You can serve the greens at room temp on a bed of fresh ricotta, drizzled with your best olive oil, and serve the bread on the side.

I should add that, like so many other things, it seems to taste best if cooked in clay. I tend to use either an unglazed clay bean pot or a Spanish cazuela, after doing the initial blanching of the greens in an ordinary pot. A Chinese sand pot works well too. If you’re curious, do read another of Ms. Wolfert’s books, Clay Pot Cookery, which contains everything you might want to know about cooking with clay.