Archive for the ‘home food production’ Category

The Winter Kitchen: Earth and Fire Sauce


In the past, when I traveled in Oaxaca, I fell in love with the moles, as nearly every traveler there does. My favorite is the rich, complex, highly seasoned mole negro, and I have made the mole paste for it a few times but find that I seldom have enough uninterrupted time to collect all the ingredients, prepare and fry them individually, grind them together, etc. There are a few good commercial brands of mole negro paste, and on the rare occasions when I want this special dish, I tend to use them.


But I often crave flavors that are somewhat reminiscent of mole negro, involving deep, rich, earthy tones with a spicy seasoned overlay and an element of slow, dark fire. For those occasions, I have come up with a seasoning paste that I can make in the winter, keep in my refrigerator, and add where appropriate. Properly speaking it’s a salsa, but in the American minds salsa is the fresher lighter tomato concoction, so I call it a sauce. The ingredient list is simple, although if you live in an area that lacks a substantial Mexican population you may need to order the chiles by mail. The prep may seem time-consuming, but comfort yourself that it’s insignificant compared to the time spent making mole negro. You’ll need a blender.

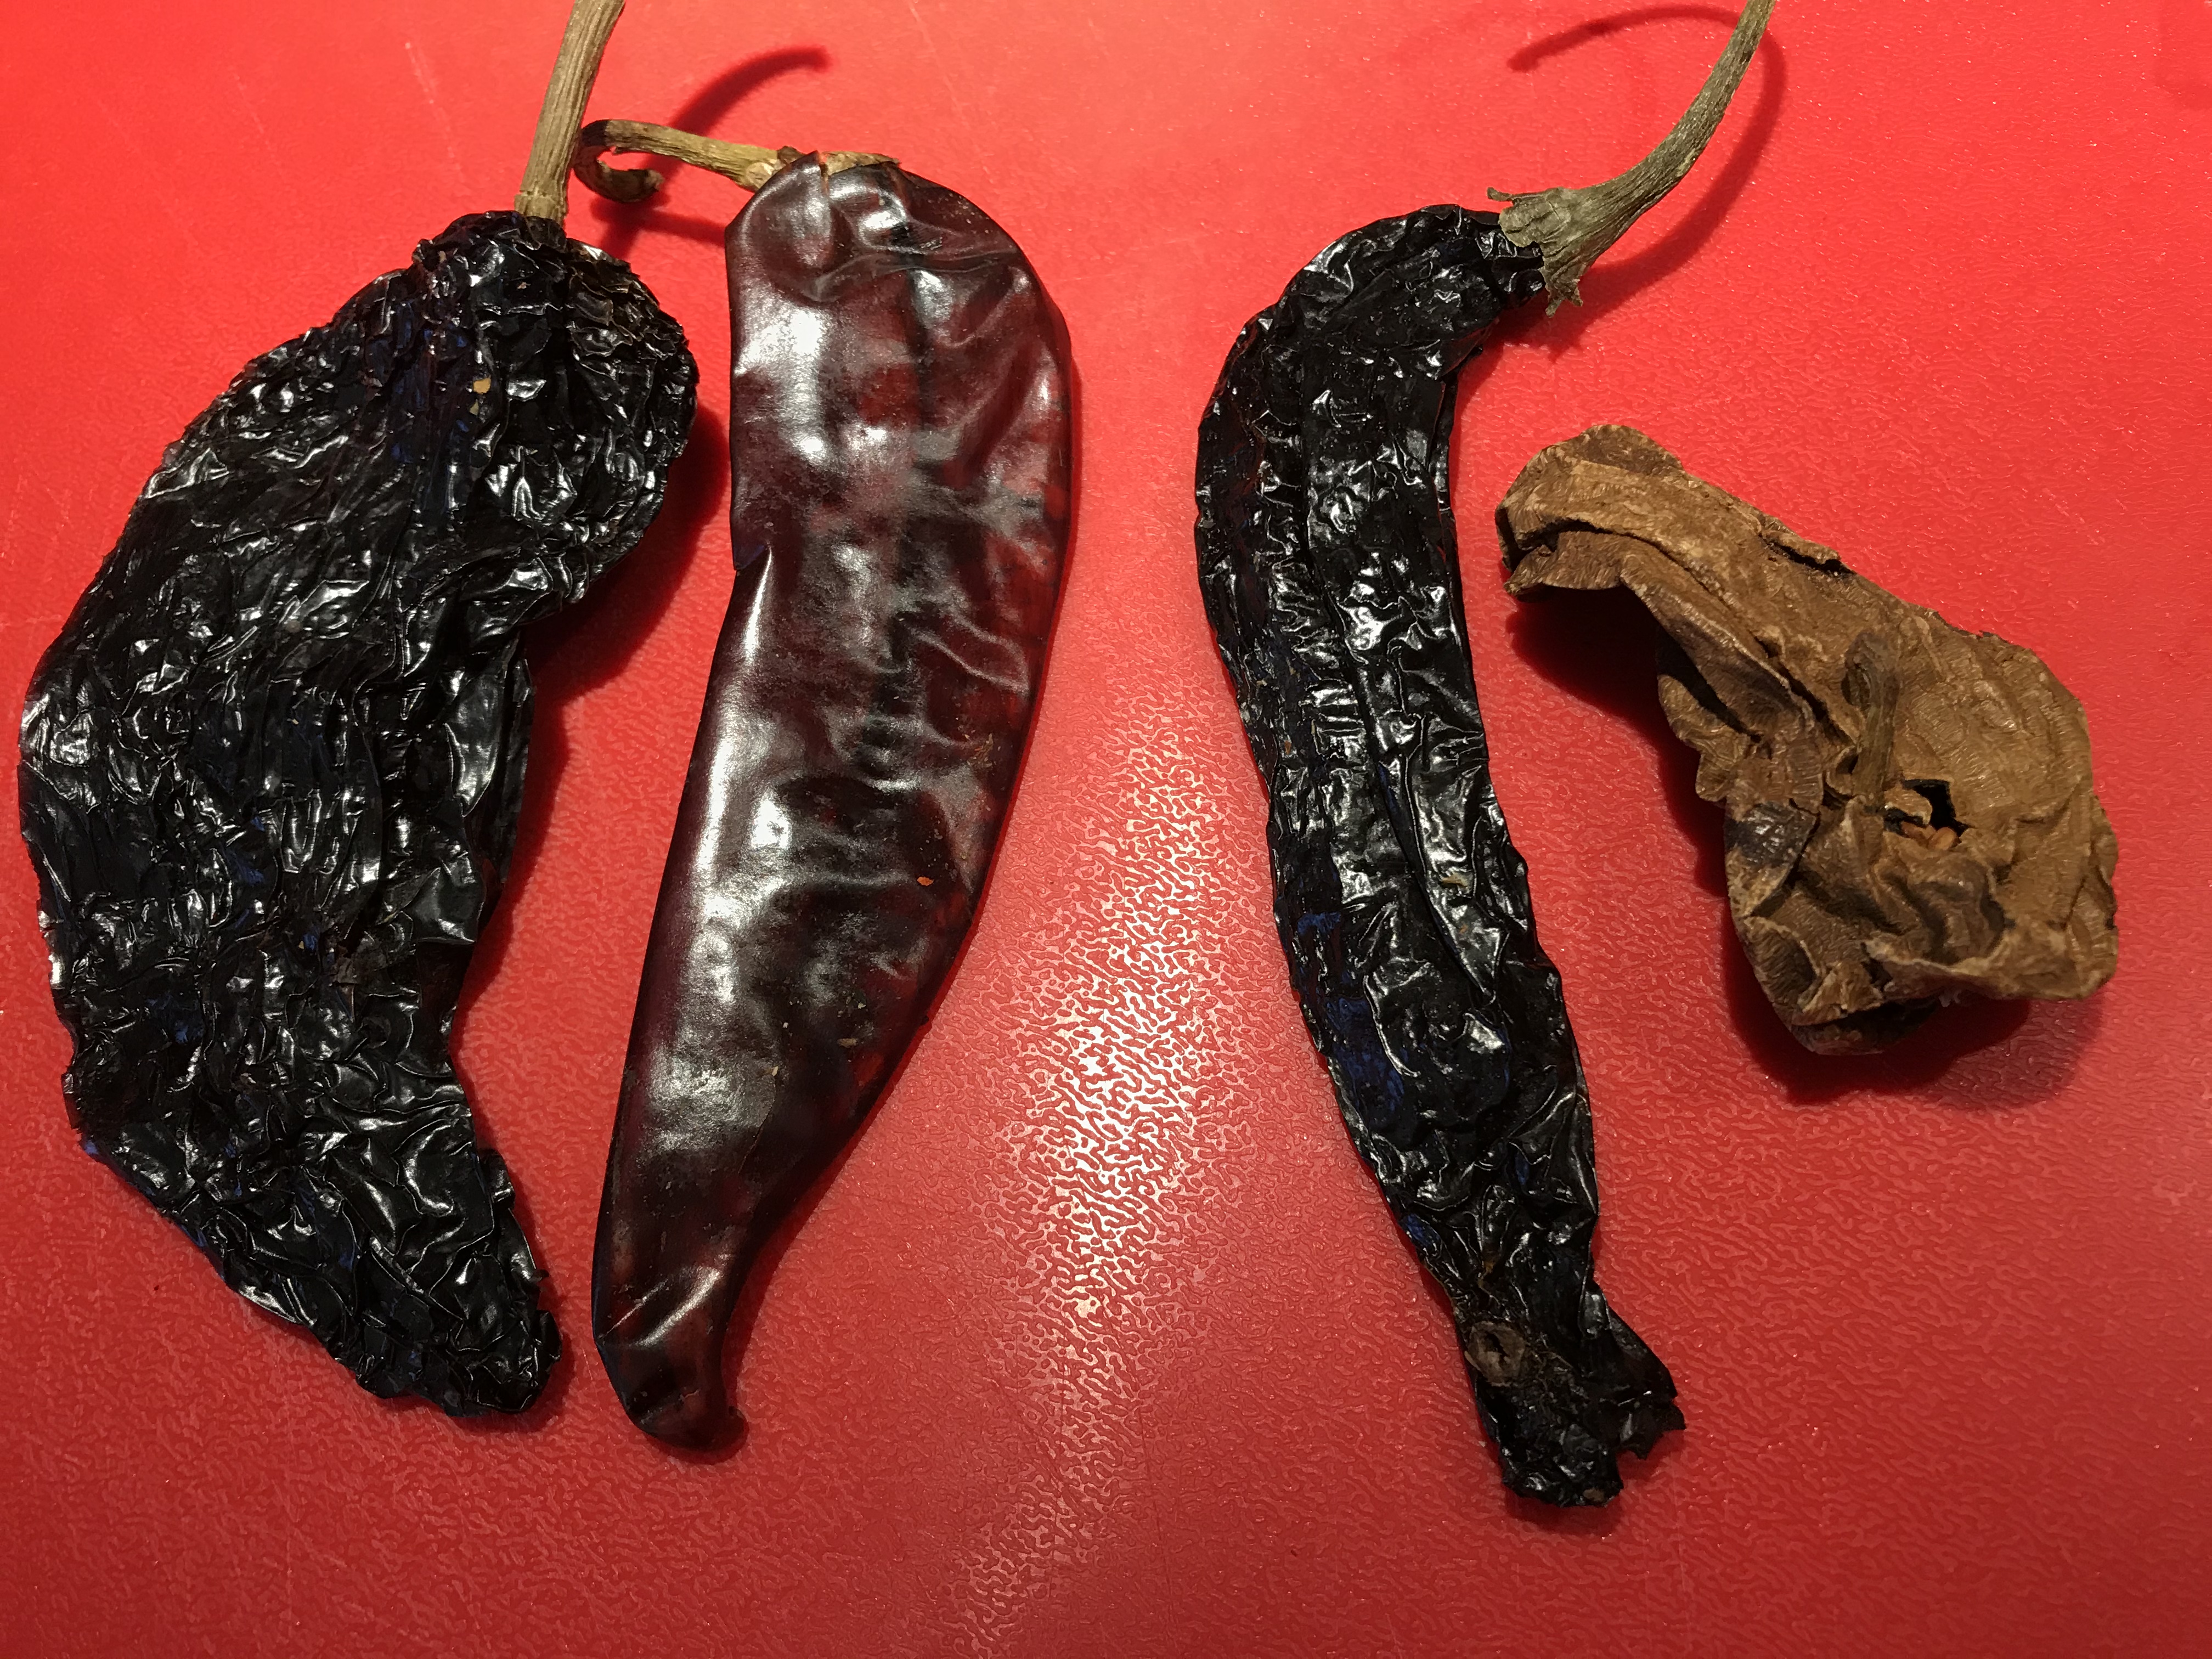
The long, narrow Pasilla negro and the light brown chipotle meco are the two on the right

7 chiles Pasilla Negro, often just sold as chiles negros

7 chiles chipotle meco (medium-sized and light brown, not small and dark red)

1 7 ounce can chipotles in adobo, including all the liquid

8 cloves garlic, not peeled

1/2 cup raisins

3 cups chicken broth

1/2 teaspoon Ceylon (canela) cinnamon or a bit less standard cinnamon

1/4 teaspoon freshly ground allspice

2 tablespoons grated piloncillo or coconut sugar

1/2 teaspoon salt, oak-smoked if available.

2 cups avocado oil for frying

1/4 cup homemade lard or more avocado oil for searing the sauce


Cut the stem ends off all the dry chiles, cut them open down one side with kitchen scissors, and scrape out most of the seeds and veins. Snip each one across the length a couple of times. In a small deep sauce pan, heat the avocado oil intended for frying to about 350 or until a piece of chili put into the oil immediately bubbles and sizzles. Have paper towels ready for draining. Put a small handful of the chiles into the oil at a time, fry them until the color changes visibly turning as needed, fish them out with a slotted spoon, and drain them. Now put the cloves of garlic, still in their skins, in the oil and let them fry until the skins are somewhat browned, and drain them. Put the raisins in the hot oil and fry just until they swell and puff, then drain. Now set the saucepan of oil aside in a very safe place to cool off.

Heat the chicken broth to boiling in another pot, turn off the heat, and put all the fried chiles in the hot broth to soak for 20 minutes. Peel the garlic cloves and add them.

Put the soaked chiles and peeled garlic cloves and their fluid in the blender jar along with the seasonings, the sugar, and the canned chipotles with all their adobo fluid. Grind smooth, scraping down the blender as needed. Add a little more water if needed to keep the blender blades turning.

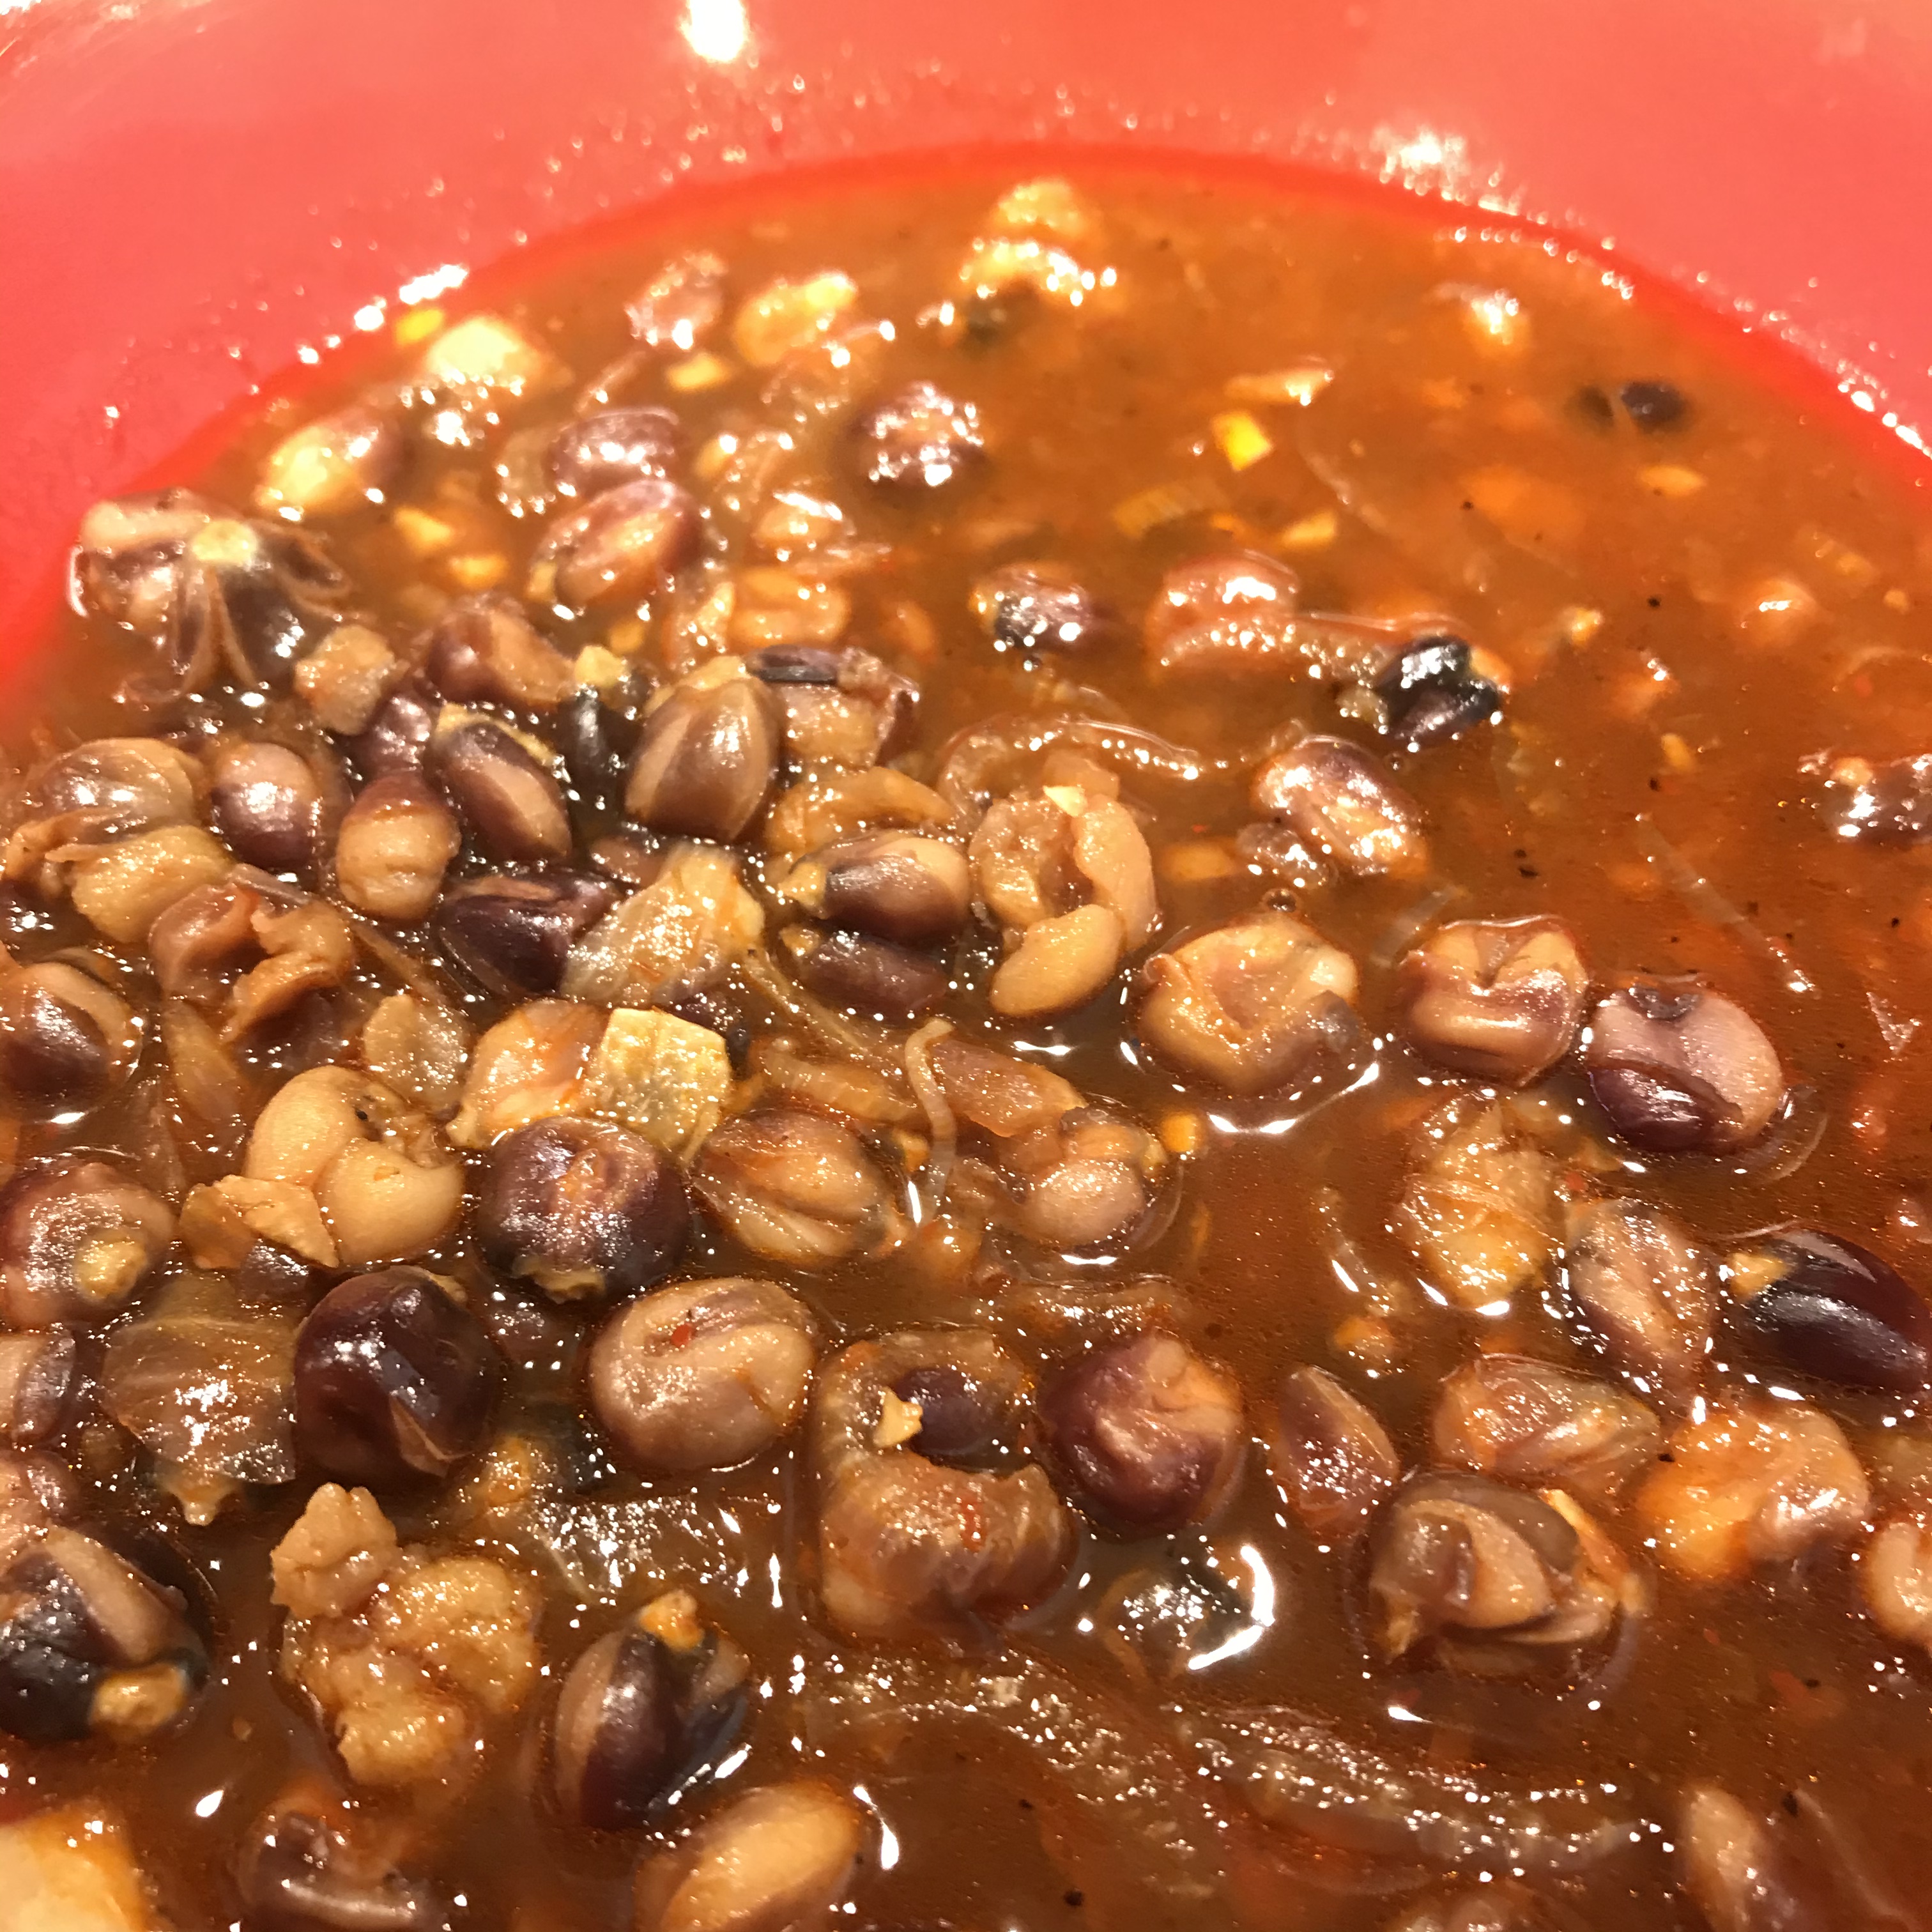
Now for the dramatic step that pulls the sauce together. In a large frying vessel (I prefer a wok to minimize the inevitable splattering,) heat the lard or avocado oil over high heat. When it’s very hot, pour in the purée from the blender jar. Use an apron and don’t lean over the stove, because it will sizzle and splatter viciously. Stir cautiously with a wooden spoon. After 3-4 minutes turn the heat down to simmer and simmer the sauce for about 30 minutes, stirring occasionally.
When ready, the sauce is very thick and will hold indentations when stirred, but it’s not cooked down to a paste. Taste it and adjust the salt if needed, but in my opinion use table salt and not smoked salt at this point. If it tastes a little bit on the acrid side, you may need to add a little more dark sugar.

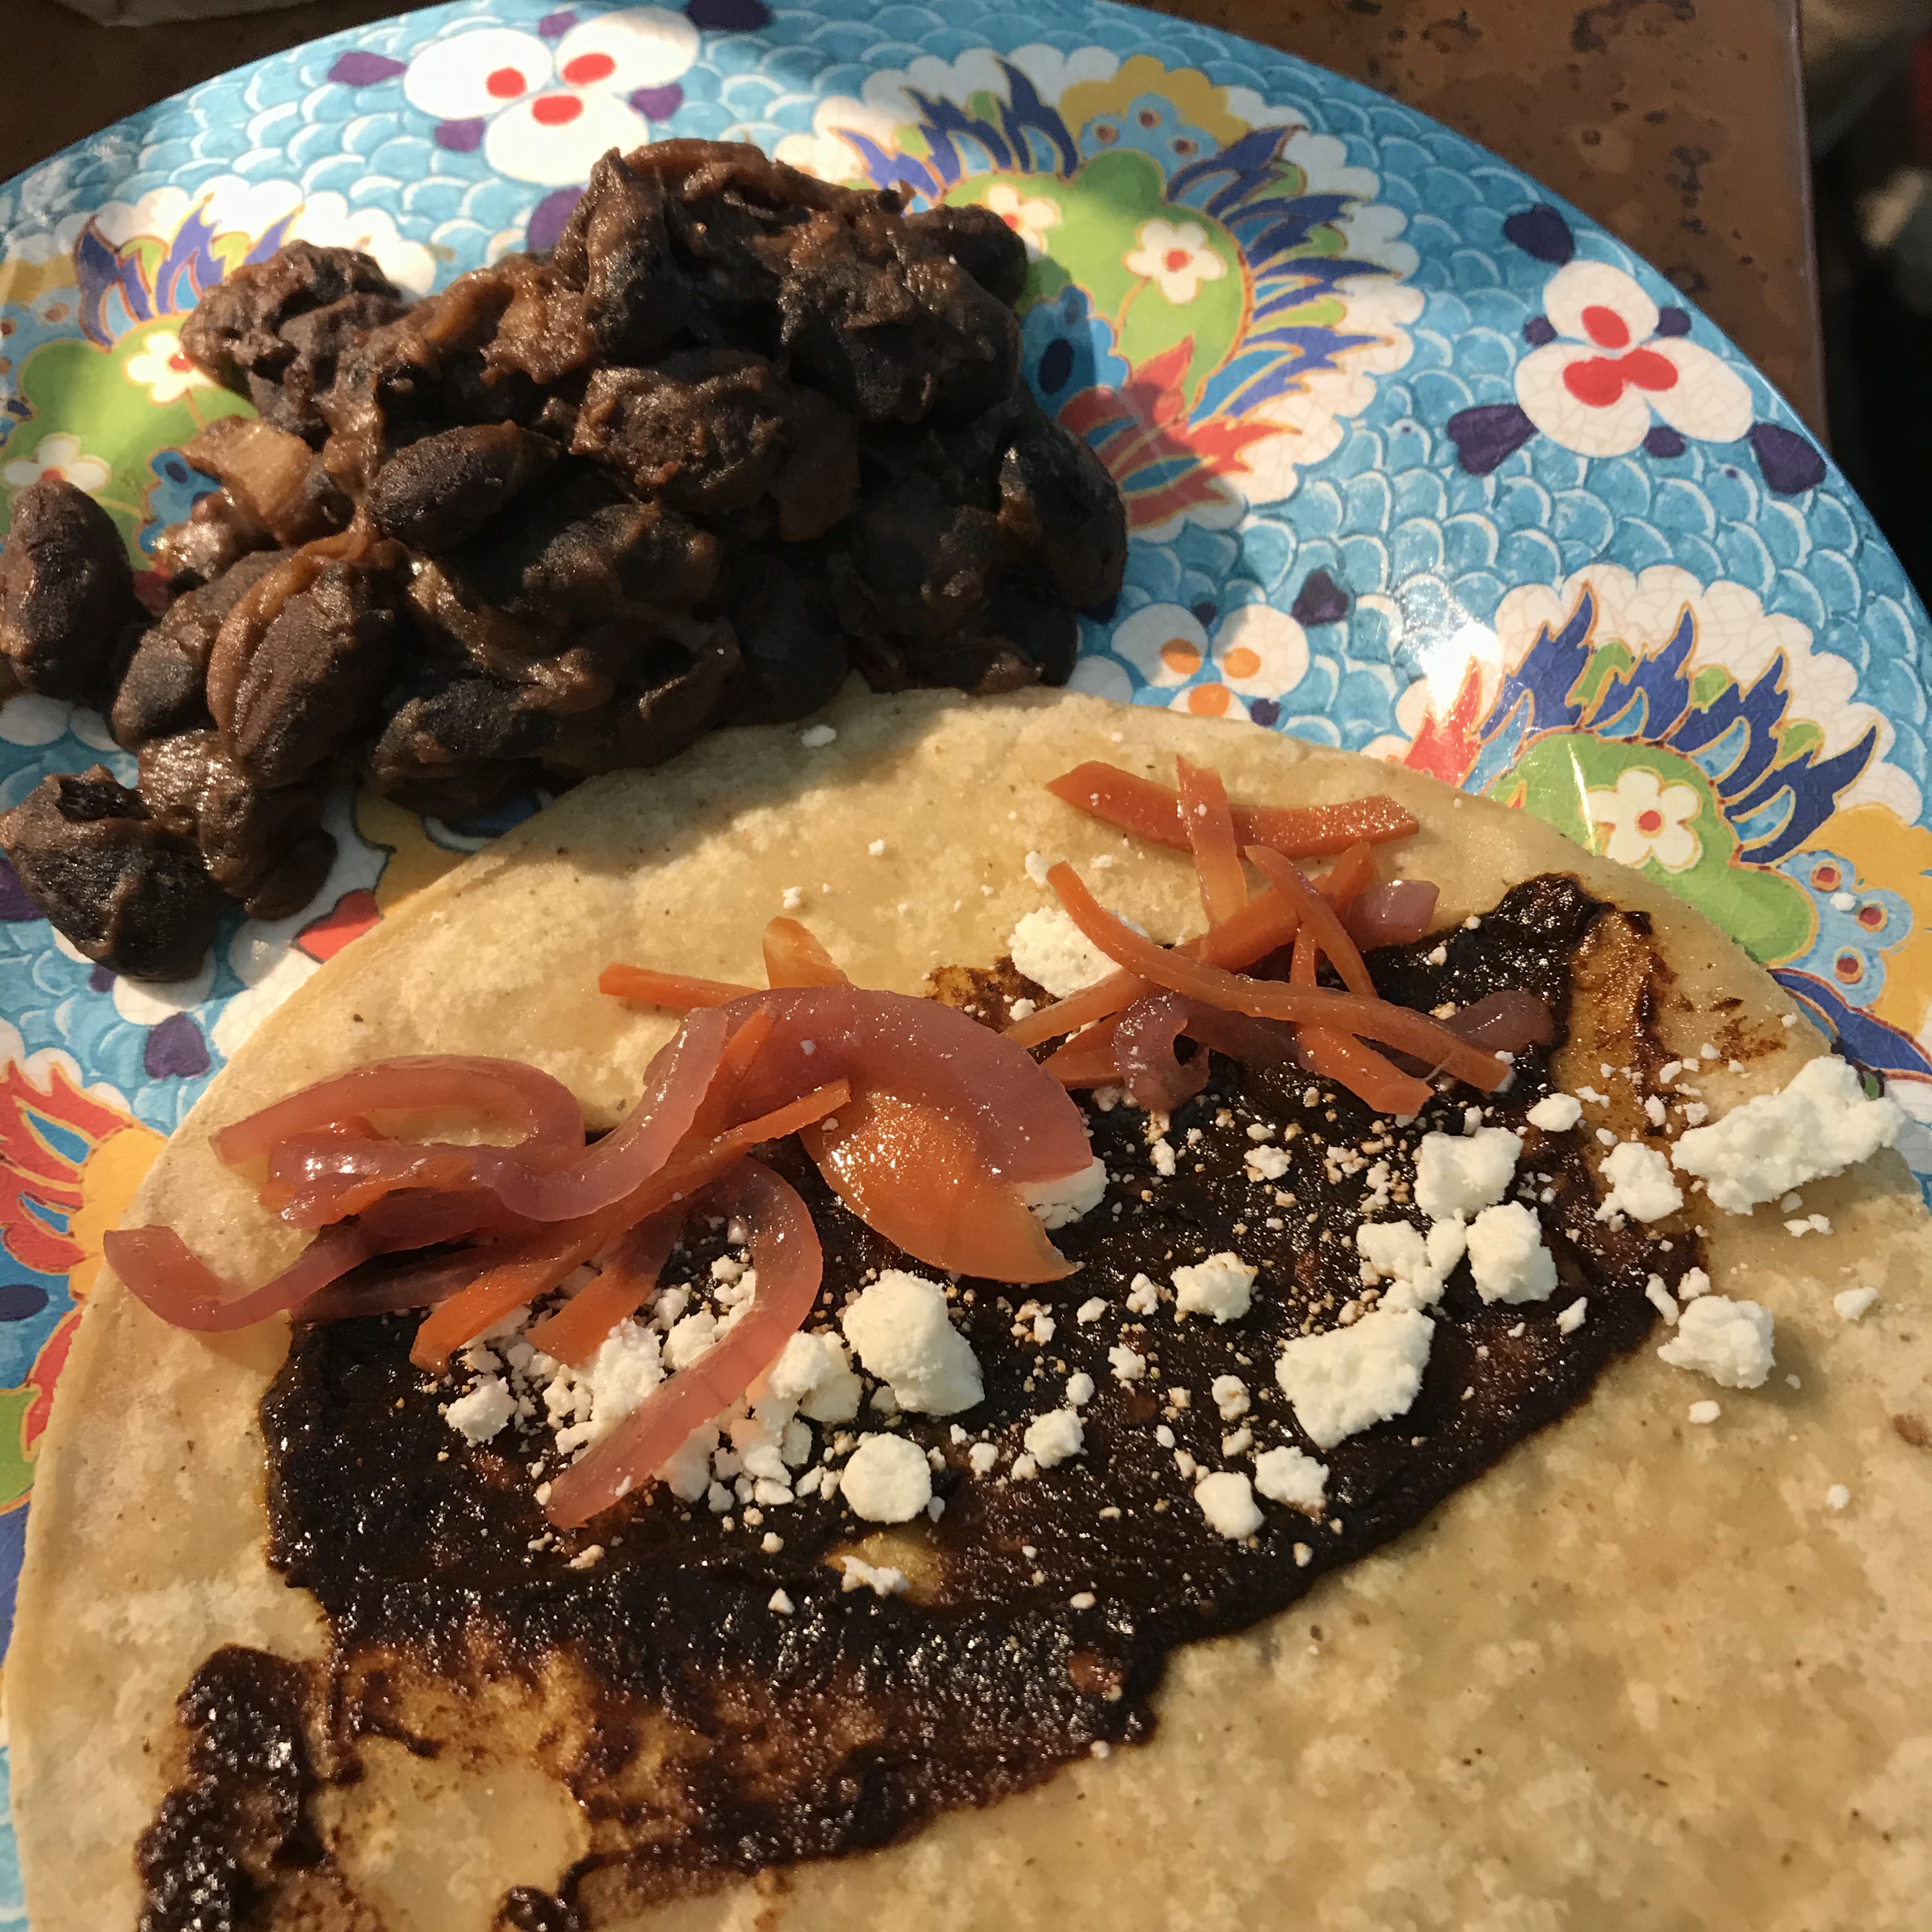
Now you’re done and can quickly and efficiently add notes of earth and fire wherever you think they are needed. Use diluted or undiluted. The finished sauce can be spread directly on hamburgers immediately after grilling. A tablespoon or two per serving of black beans adds immeasurably to their meaty richness,  and this combination is especially good with a dollop of crème fraîche on top. A few tablespoons per cup of chicken or turkey broth makes a wonderful sauce for roasted or smoked birds. It could be used as a rub for grilled chicken, although you need to be careful not to burn it. I think that it might make a good grilling rub for salmon or other strong-flavored fish. It adds wonderful depth to sautéed mushrooms, and I think it would be great on grilled carrots or roasted sweet potatoes, especially with a pat of butter on top. For a quick snack or lunch, nothing beats a quickly griddled tortilla with a smear of Earth and Fire sauce, a sprinkle of crumbled cotija  cheese, and a few quick-pickled vegetables. A quick soft taco also makes a great cook’s treat. If you’re hungrier than that, add some frijoles negros or frijoles refritos as shown at the top of this post. A good dollop in a bowl of good posole elevates it to a feast.

It can be frozen after preparation for use later, either in jars or in individual portions in large ice cube trays. On late afternoons when you need something warm and not too filling, a cube could be dropped in a cup of hot chicken broth to make a warming “instant” soup.


A few notes on ingredients:
The best chiles that I know of come from The Chile Guy
The best beans and posole corn that I know of come from Rancho Gordo
The only lard worth using is the lard that you render yourself, not the awful commercial stuff. If you don’t want to render a little, use oil instead.
My favorite tortillas are the nixtamalized heirloom corn tortillas from Masienda. In my area, Whole Foods carries them.

A Quick Note on Bamboo

I love bamboo shoots, and several years ago I bought two plants of Phyllostachys dulcis, the famously invasive and delicious sweetshoot bamboo. I enriched the soil, planted and mulched, supplied plenty of water, and waited confidently for them to invade, so that I could start eating. Four years later the two plants are a scraggly 5’ tall each. Each year one or the other, but not both, makes exactly one spindly shoot which often follows a kamikaze trajectory toward the goat paddock.   In all this time, I have eaten exactly one bamboo shoot. It was very good, but a pretty poor return on investment.

This May, after a few days of absence from the garden, I was looking along the fence row inspecting hops vines  when outside my fence, in the desert open space, I saw a startlingly robust bamboo shoot almost 20 feet tall.  Phyllostachys dulcis is spreading out into an area that is impacted, alkaline, and gets only our natural rainfall, which is 10 to 11 inches per year.  In short, it is a bamboo’s version of Hell, and yet this is where my expensive and pampered plants have chosen to stake their claim.

Plants are naturally perverse, and the more you want a particular plant to flourish, the more perverse it typically becomes.  It is as if they thumb their noses at the whole concept of domestication.  But next spring I will watch the desert strip outside the fence and see if the miracle repeats itself. If so, I may finally harvest enough bamboo shoots to be worthwhile.  If it finally begins to behave like a real invasive, I can always take my goat out on a leash to teach P. dulcis some manners.

I should add that if you don’t live in the desert, you can’t afford to be cavalier about invasive plants. Be aware of your neighbors, don’t invade their space unintentionally, and if you plant an invasive bamboo you really need to create proper rhizome barriers. My P. dulcis  plants have a foraging goat between them and any neighbors, and the part of the open space they are growing into actually belongs to my property. I doubt that they can get far on 11” of water annually, but if they show truly invasive behavior out there I have room to make a concrete barrier.  I have never seen a bamboo get out of hand here in the desert, and don’t anticipate it happening now, but I’ll act assertively if it does.

Nettle Ale, and notes on the Drinkmate

One of the nicest things about having an active permaculture garden is that you have strange plants around you in all phases of growth and you’re led to read and to experiment. A couple of months ago I found myself eyeing my healthy nettle patch, where the nettles were almost three feet tall and well past the greens phase, and wondering what could be done with them. I got on the Internet and came across British recipes for nettle beer. I was curious about it because the cooking water from nettles has a strong and distinctive taste that I don’t find exactly pleasant, yet people reported liking the ferment. Well, no harm in trying. I started with three gallons of water in my huge stockpot, and picked (with sturdy leather gloves) about 75 nettle tops. I also added 10 large hops leaves and 10 large Concord grape leaves on grounds that, if the brew was revolting, at least it would contain some resveratrol and chalcones. I boiled all this at a full rolling boil for fifteen minutes, and then let it cool. I fished all the plant material out with a strainer scoop, pressed all the residual juice out and returned it to the pot, and gave the pressed mass of leaves to the chickens. No sense in wasting those nutrients.
I brew by instinct and not by recipe, and I think the next step is the most important: TASTE THE COOLED JUICE AND THINK ABOUT THE FLAVOR before sweetening the liquid. The sweetness will be fermented out, so it’s important not to think of it as part of the finished flavor.  Don’t think in terms of a recipe that you’ve read. Think about what it needs to improve the flavor, and try to supply that.  This juice was not promising, with a strong nettle taste and little other flavor. It lacked any acidity so I added the juice of four oranges and one lemon, giving it a light but pleasant acidity. I decided to go with the strong herbal flavor and added a large angelica leaf and stem, which would remain in the fermenter during primary fermentation.  I also added back the squeezed rind of one of the oranges. Use organic if you do this. Next, I needed to give the yeasty beasties something to eat. I sweetened with one pound of organic sugar per gallon of water, for an eventual alcohol level of 4-5%, just above near-beer, and pitched a yeast intended for hard cider. This all went into the primary fermenter, where it bubbled merrily for a couple of weeks. When the bubbling slowed, I racked it into a clean fermentation bucket, leaving the angelica leaf and rinds behind with the sediment. I tasted  the brew at this point,  and to my surprise the distinctive nettle taste was completely gone.  I could taste the aromatics from the oranges, a slight and becoming touch of bitterness from the angelica and hops leaves,  and an overall mild herbal flavor, and while the brew  still tasted raw and unfinished, it was pleasant.  After another two weeks, it was racked into a keg and put under carbonation.   Chilled and  carbonated, it has become one of our favorite choices for a quick glass of something-or-other in the evening.  It is blessedly  low in alcohol and good with light meals like salads. It tastes best sweetened slightly with a drop or two of liquid stevia or similar added to a glassful. We like it so much that I promptly started another batch dubbed Stinger Brew II,  but this time I left out the oranges and just added the juice of one lemon to a 4 gallon batch.  When primary fermentation is finished and I rack it off for secondary fermentation, I will taste and see if it needs any more acidity, and I plan to dry hop it at this stage because my hops should be in full bloom at that point. Where Stinger I is more like a light herbal wine, Stinger II will be more like a light true ale.  If you really want it to taste like a beer rather than a wine, you could use malt syrup  or malt extract  to sweeten the juice, but I like the more winey  quality that comes from using sugar.

So, as I am always saying, embrace the experimental nature of cooking, brewing, gardening, and life.  If I did this commercially, I would have to keep very exact measurements for consistency between batches and would have to try to maintain each batch exactly like the one before, since that is what customers expect.  But my ingredients are variable, my process is variable, I am variable, and I do not want two batches that taste the same.  This is very freeing.  Liberating yourself from the tyranny  of the recipe is one of the nicest things that can happen to a cook and brewer.

Beer, wine, and mead can be carbonated by charging with some sugar, bottling in swing-cap bottles, and waiting. But there are easier and surer ways. If I want a large quantity carbonated, my husband oversees a kegerator made for refrigerating and carbonating 5 gallon kegs, and then the bubbly stuff is dispensed via a tap. It’s very handy, but needless to say, you don’t necessarily want 5 gallons of any one thing. In those cases, I use the Drinkmate. It’s a sleek carbonation device that uses smaller CO2 canisters and special bottles to carbonate a liter or less at a time in just a couple of minutes. There are a number of carbonation devices on the market, and they all work just fine for carbonating water. The Drinkmate is different because it will carbonate any liquid. Carbonated juice could be delicious if you drink juice, and it occurs to me that sparkling mint tea would be delicious in the summer.You can read more about the device here. If you want to buy one, you can get it here. Replacement CO2 cylinders are available at Bed Bath and Beyond, and empties can be traded in there for half-price new cylinders. Order a few extra bottles when you order your Drinkmate. I’ve noticed that when plain carbonated water is available in the fridge, I drink more water in total, and sparkling water is better with meals than plain water. Carbonation also brings out the flavor of water kefir, which I make in large quantities. With or without a drop of sweetener, it’s delicious.

The Greens of Early Summer

I love leafy greens and consider them one of the healthiest foods in the world, as long as they were raised in a clean fashion.  If you are lucky enough to have a garden and an active permaculture property, you can nearly always eat some greens but the source of your greens changes throughout the growing season.  Right now, we are in the glory season for lambsquarters, and they are everywhere and are at their tender best right now. I eat huge quantities of them, but I have written so much about them elsewhere that in this post I will say very little except: for the sake of your health and your palate, learn to identify them, harvest them, prepare them, and eat them.

Today I decided to write about some uncommon greens which are unique to the season.  Americans don’t think very much about eating the leaves of trees, but some of them are very appealing, and my favorite “tree green“ is the young sprouts of mulberry trees.  It is almost never possible to gather good edible leaves from mature trees. The best mulberry greens are the tips of actively growing shoots from trees that have been cut back, and I am lucky because on the walking trail near the river in my area, several mulberry trees have been cut back to keep them from impinging on the trail. They produce a forest of new growth, and it is the tips of that new growth that are good to eat.   Harvest only as far down as the stem can easily be snapped with your fingernail. If it bends or creases instead of snapping, go further up toward the tip.

Incidentally, there is some pretty ridiculous stuff on the Internet to the effect that mulberry leaves will get you high or the water from cooking them will. Utter rot.  This is one of those unfortunate cases of one writer printing a piece of misinformation and dozens of others picking it up as gospel.  I have been eating young mulberry tips for decades, and nothing remotely interesting has ever happened as a result. Euell Gibbons ate them, Samuel Thayer eats them,they are used as a tea throughout Southeast Asia,  and there is no reliable report anywhere of them causing hallucinations. You must always do your own due diligence and make your own decisions, but I simply don’t worry about it.

For a quick lunch for two, I gathered a double handful of mulberry tips. I washed them and cut them in fine cross sections of less than a quarter inch, chopping a large bunch at a time.     Then I considered what else to add.

I could’ve used sorrel for a tart element, but since the leaves on my petit syrah grapevine are young and tender, I decided on several of them.  Wash them, stack them, roll them up like a cigar, and sliver them very thin with a sharp knife.

For flavoring, garlic is always a favorite of mine, and right now the garlic is forming bulbs but they are small and the skin is still young and tender. I pulled an entire head since they are mild this early, peeled off just the toughest outer layers, and sliced the rest finely in cross section and chopped it. The material that would later become the skins is full of allicin, and is very desirable.  But I also wanted some herbal flavor, so I grabbed the top of one of my bronze fennel plants. At this time of year, when it is getting full and bushy, bronze fennel is so ornamental that I can hardly stand to use it, but it tastes good so I try to overcome my scruples.

I decided that I wanted a texture element, and this time of year my favorite crisp texture is the scapes of last year‘s leek plants.

Cut them before the bulb on top begins to open, peel off the very tough outer skin, and then use a vegetable peeler to get all stringy bits off.

As I got ready to cook,  I decided to cut the stalks in quarter inch  cross sections because it would go better with the other textures. The taste of leek stalks is soft, oniony, and sweet.

First heat a skillet over medium heat.  Then add your oil of choice. I used a mixture of olive and avocado oil.  When the oil is hot, put in the chopped garlic, leek stalk pieces, and fennel.  Sauté until the garlic looks cooked. Add the chopped mulberry leaves and grape leaves, and because the texture of mulberry leaves tends to be dry, I added a quarter cup of water at this time.  Add salt to taste, and sauté until the greens are cooked to your liking and any added water is cooked away but the greens aren’t too dry. Personally, I like tree greens a bit on the done side, since they tend to be a bit chewy when cooked al dente.   Taste for seasoning, and then set your greens mixture aside in a bowl, reheat the skillet, put in a knob of butter, and scramble whatever you think is the right number of eggs for two people.  When cooking for my husband and myself, I always use a mixture of three eggs and three additional egg yolks, beaten together with about a tablespoon of cream.  When the eggs are scrambled and have less than a minute left to cook, return the greens to the pan and stir the mixture up together, but you want discrete lumps of egg to remain among the greens.   Serve onto plates, grind over fresh pepper to taste, and salt as needed.

Besides mulberry and  grape leaves, I’m giving thought to other climbing perennials or trees that might be useful for greens.  I have a linden tree that I planted specifically for greens, however the texture turned out to be somewhat mucilaginous and if there is one thing I dislike, it is what my husband calls the “mucoid food group.“  They are fine in a salad when young, but I don’t care for them cooked at all.  I am beginning to eye the shoot tips on Siberian elm trees that have been cut back. My goat and chickens eat them in huge quantities, and maybe I could too,  so I have been searching for data, especially because this is an enormously prolific trash tree in my area.  According to the website Eat the Weeds, run by the prolific and reliable Green Deane, the very young leaves of both Siberian elms and Chinese elms are edible and can be used interchangeably with each other. So I will be trying that in the future. I’ll report back.