Archive for the ‘urban homesteading’ Category

Chicken Glacé Pulls It All Together

image

At about age 20, in a marvelous cookbook called The Supper of the Lamb,  I learned about glacé de viand.  I am still making it decades later, because it works kitchen magic and there is no commercial substitute. Think of it as a boullion cube that died and went to heaven. Rather than giving a nasty chemical edge to your sauce, it lends a subtle fullness and richness and pulls together any flavors that you care to add or elevates simple wine and cream and pan deglazing to an artful dish.

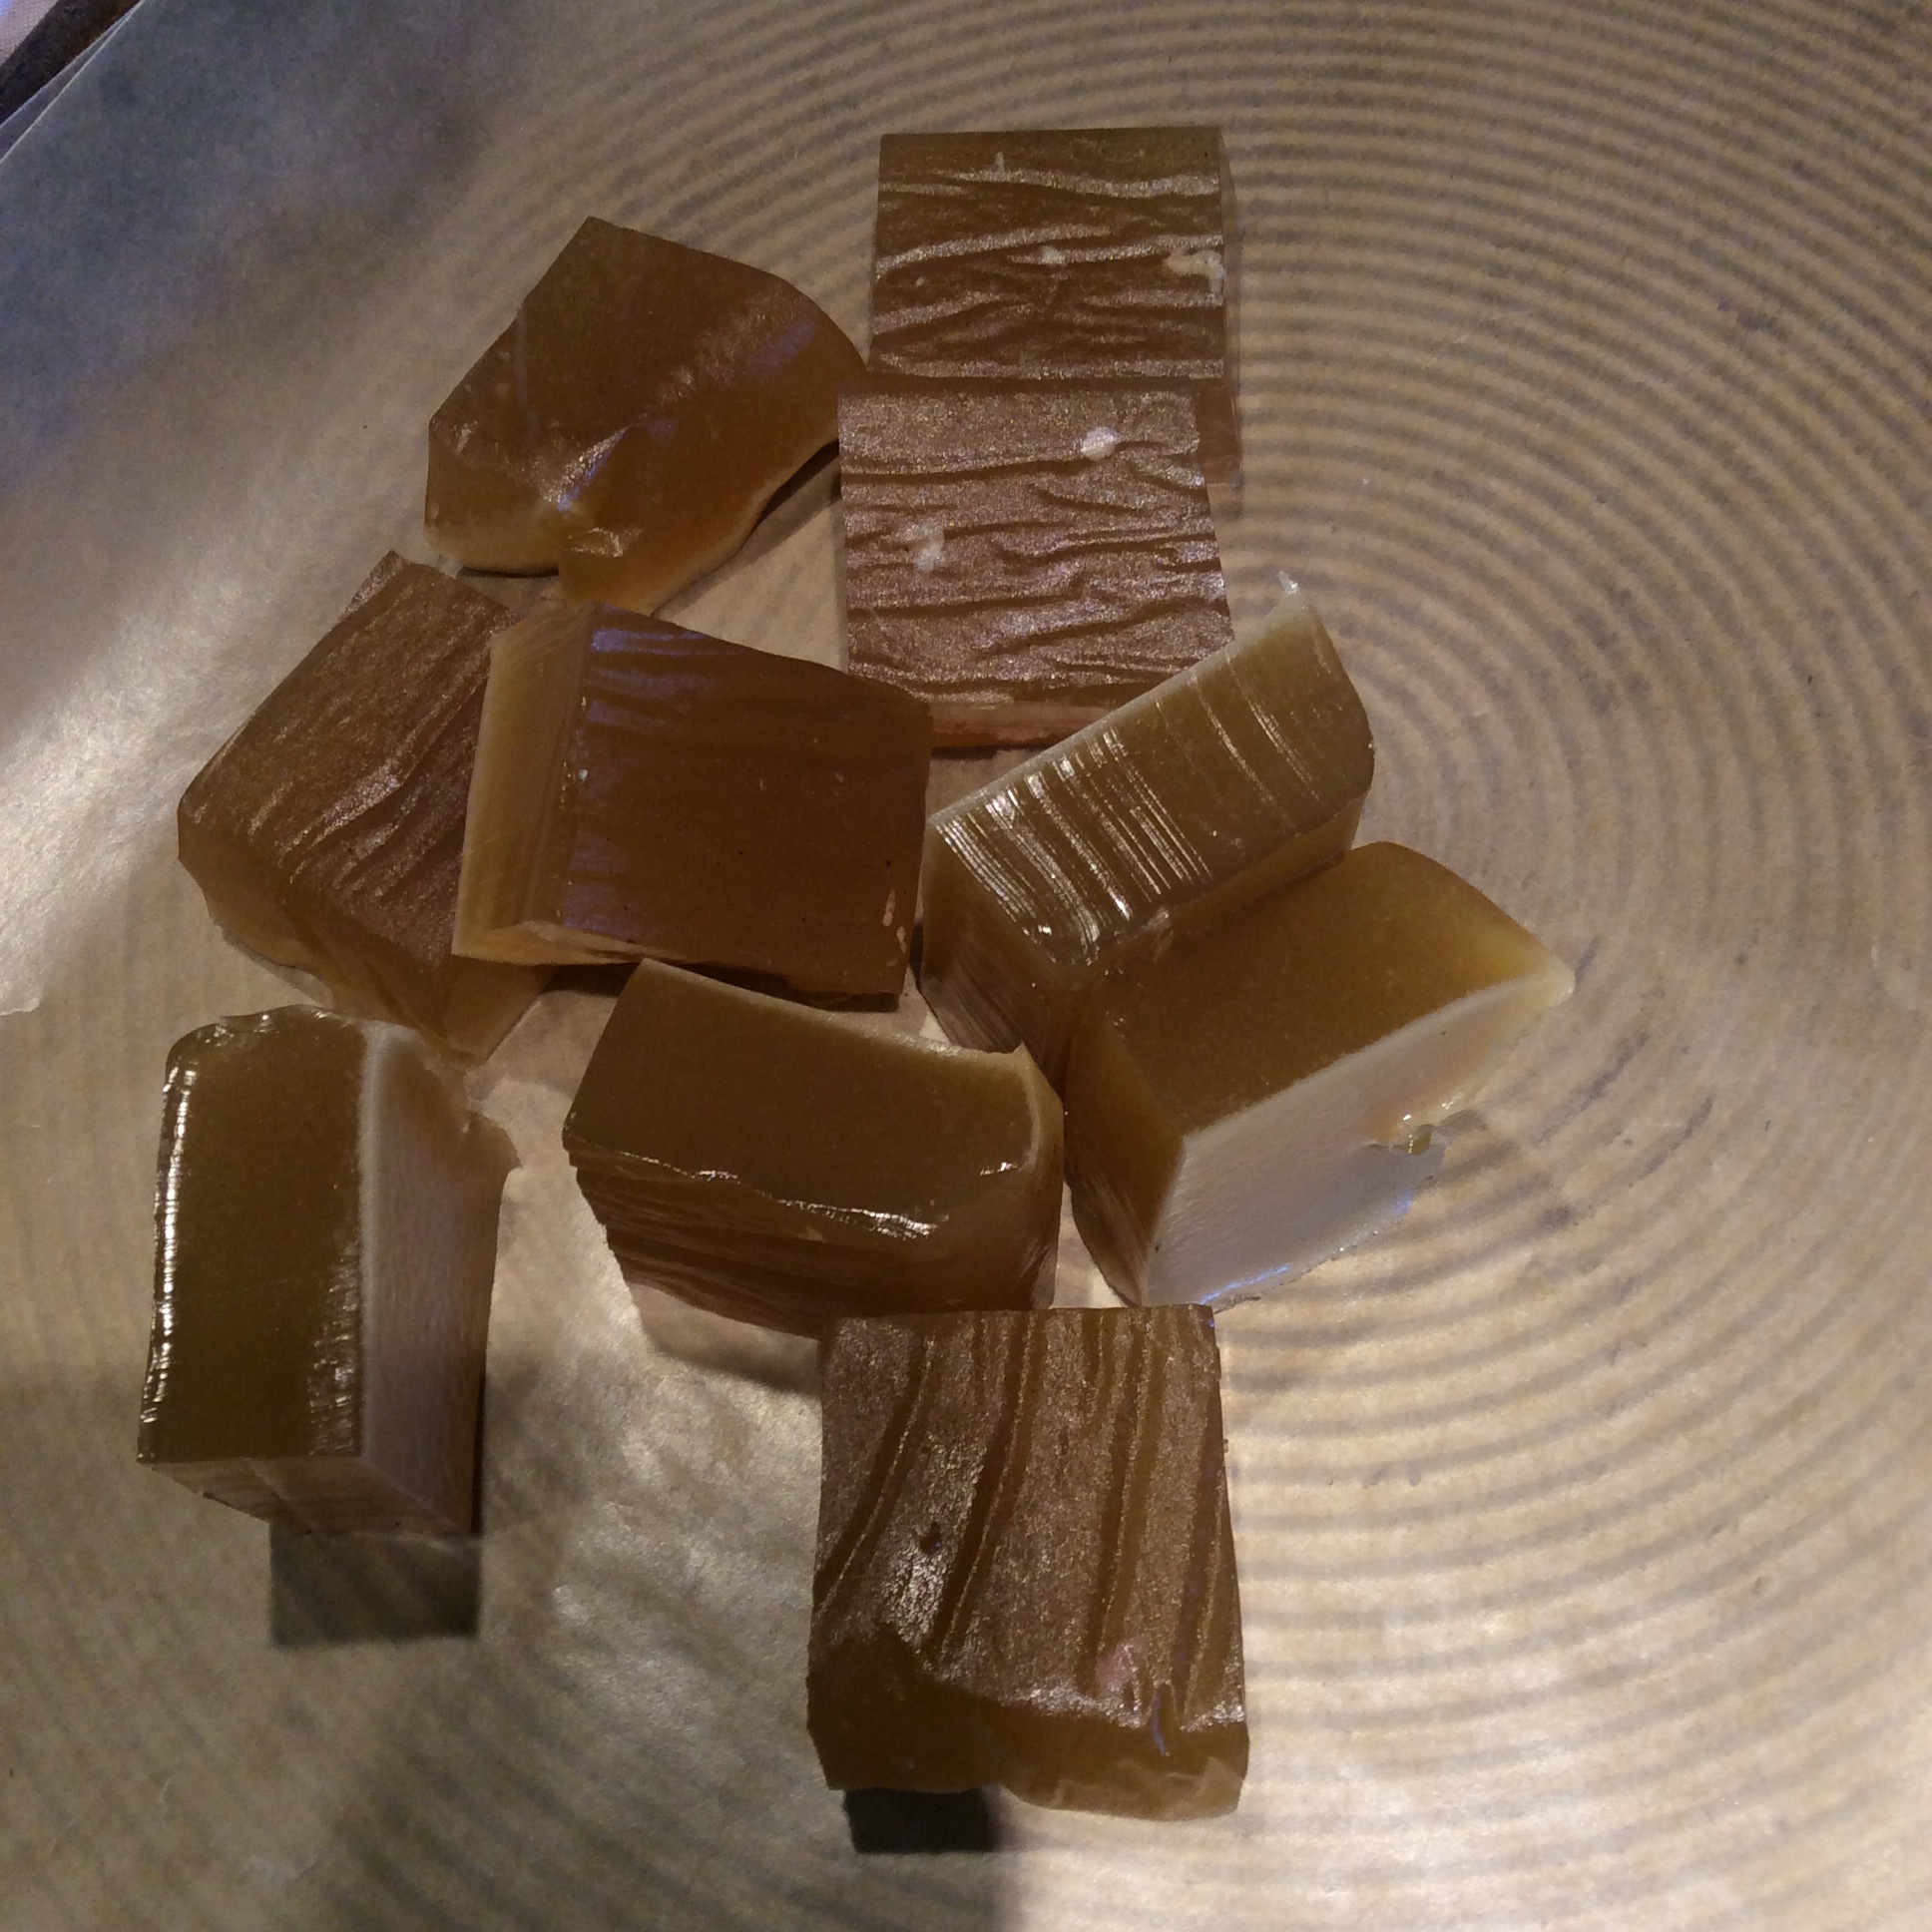
The principle  could not be simpler. Make a big pot of excellent stock, then cook it down into a thick syrup that gels hard when put in the refrigerator.  Cut your pure meat gelatine into cubes, freeze them until you need them, and throw one in every time you make a pan gravy, or cook anything where concentrated wonderful meat juice would be a good addition. You can also make it with roasted beef or veal bones to go in meat dishes.

In recent years I have been able to make my broth out of my old laying hens, and there is no good substitute for a really old hen full of omega-3s and collagen from a long and well-fed life. But you can make do with backs and necks of any good organic chickens. Roast them golden in a hot oven, fill your pot with them, add an onion, a carrot, and a stalk of celery, add enough cold water to cover, bring slowly to a simmer, and simmer forever. I simmer for 24 hours, so I only make broth on weekends. Cool, remove all solids and strain the stock, return to the pan, and boil down over high heat. I make at least a couple of gallons of broth at a time, so the final boiling-down takes a few hours and has to be watched. I do it when I have other processing tasks to do in the kitchen. Boil, boil, boil, until finally the  stock looks darker and thicker and is reduced to a fraction of its former volume. Don’t let it burn, which it will readily do when it’s really concentrated. Thick bubbles in clusters will form. Pour it out into a square baking pan, chill a few hours, and see if it sets stiffly. If not, put it back in a saucepan and boil some more, then test again. After you have done it a few times, you can tell by looking at the bubbles when it’s ready to gel.

Once chilled and stiff, cut into cubes, put them on wax paper on a baking sheet, freeze, and put in a plastic bag in the freezer.

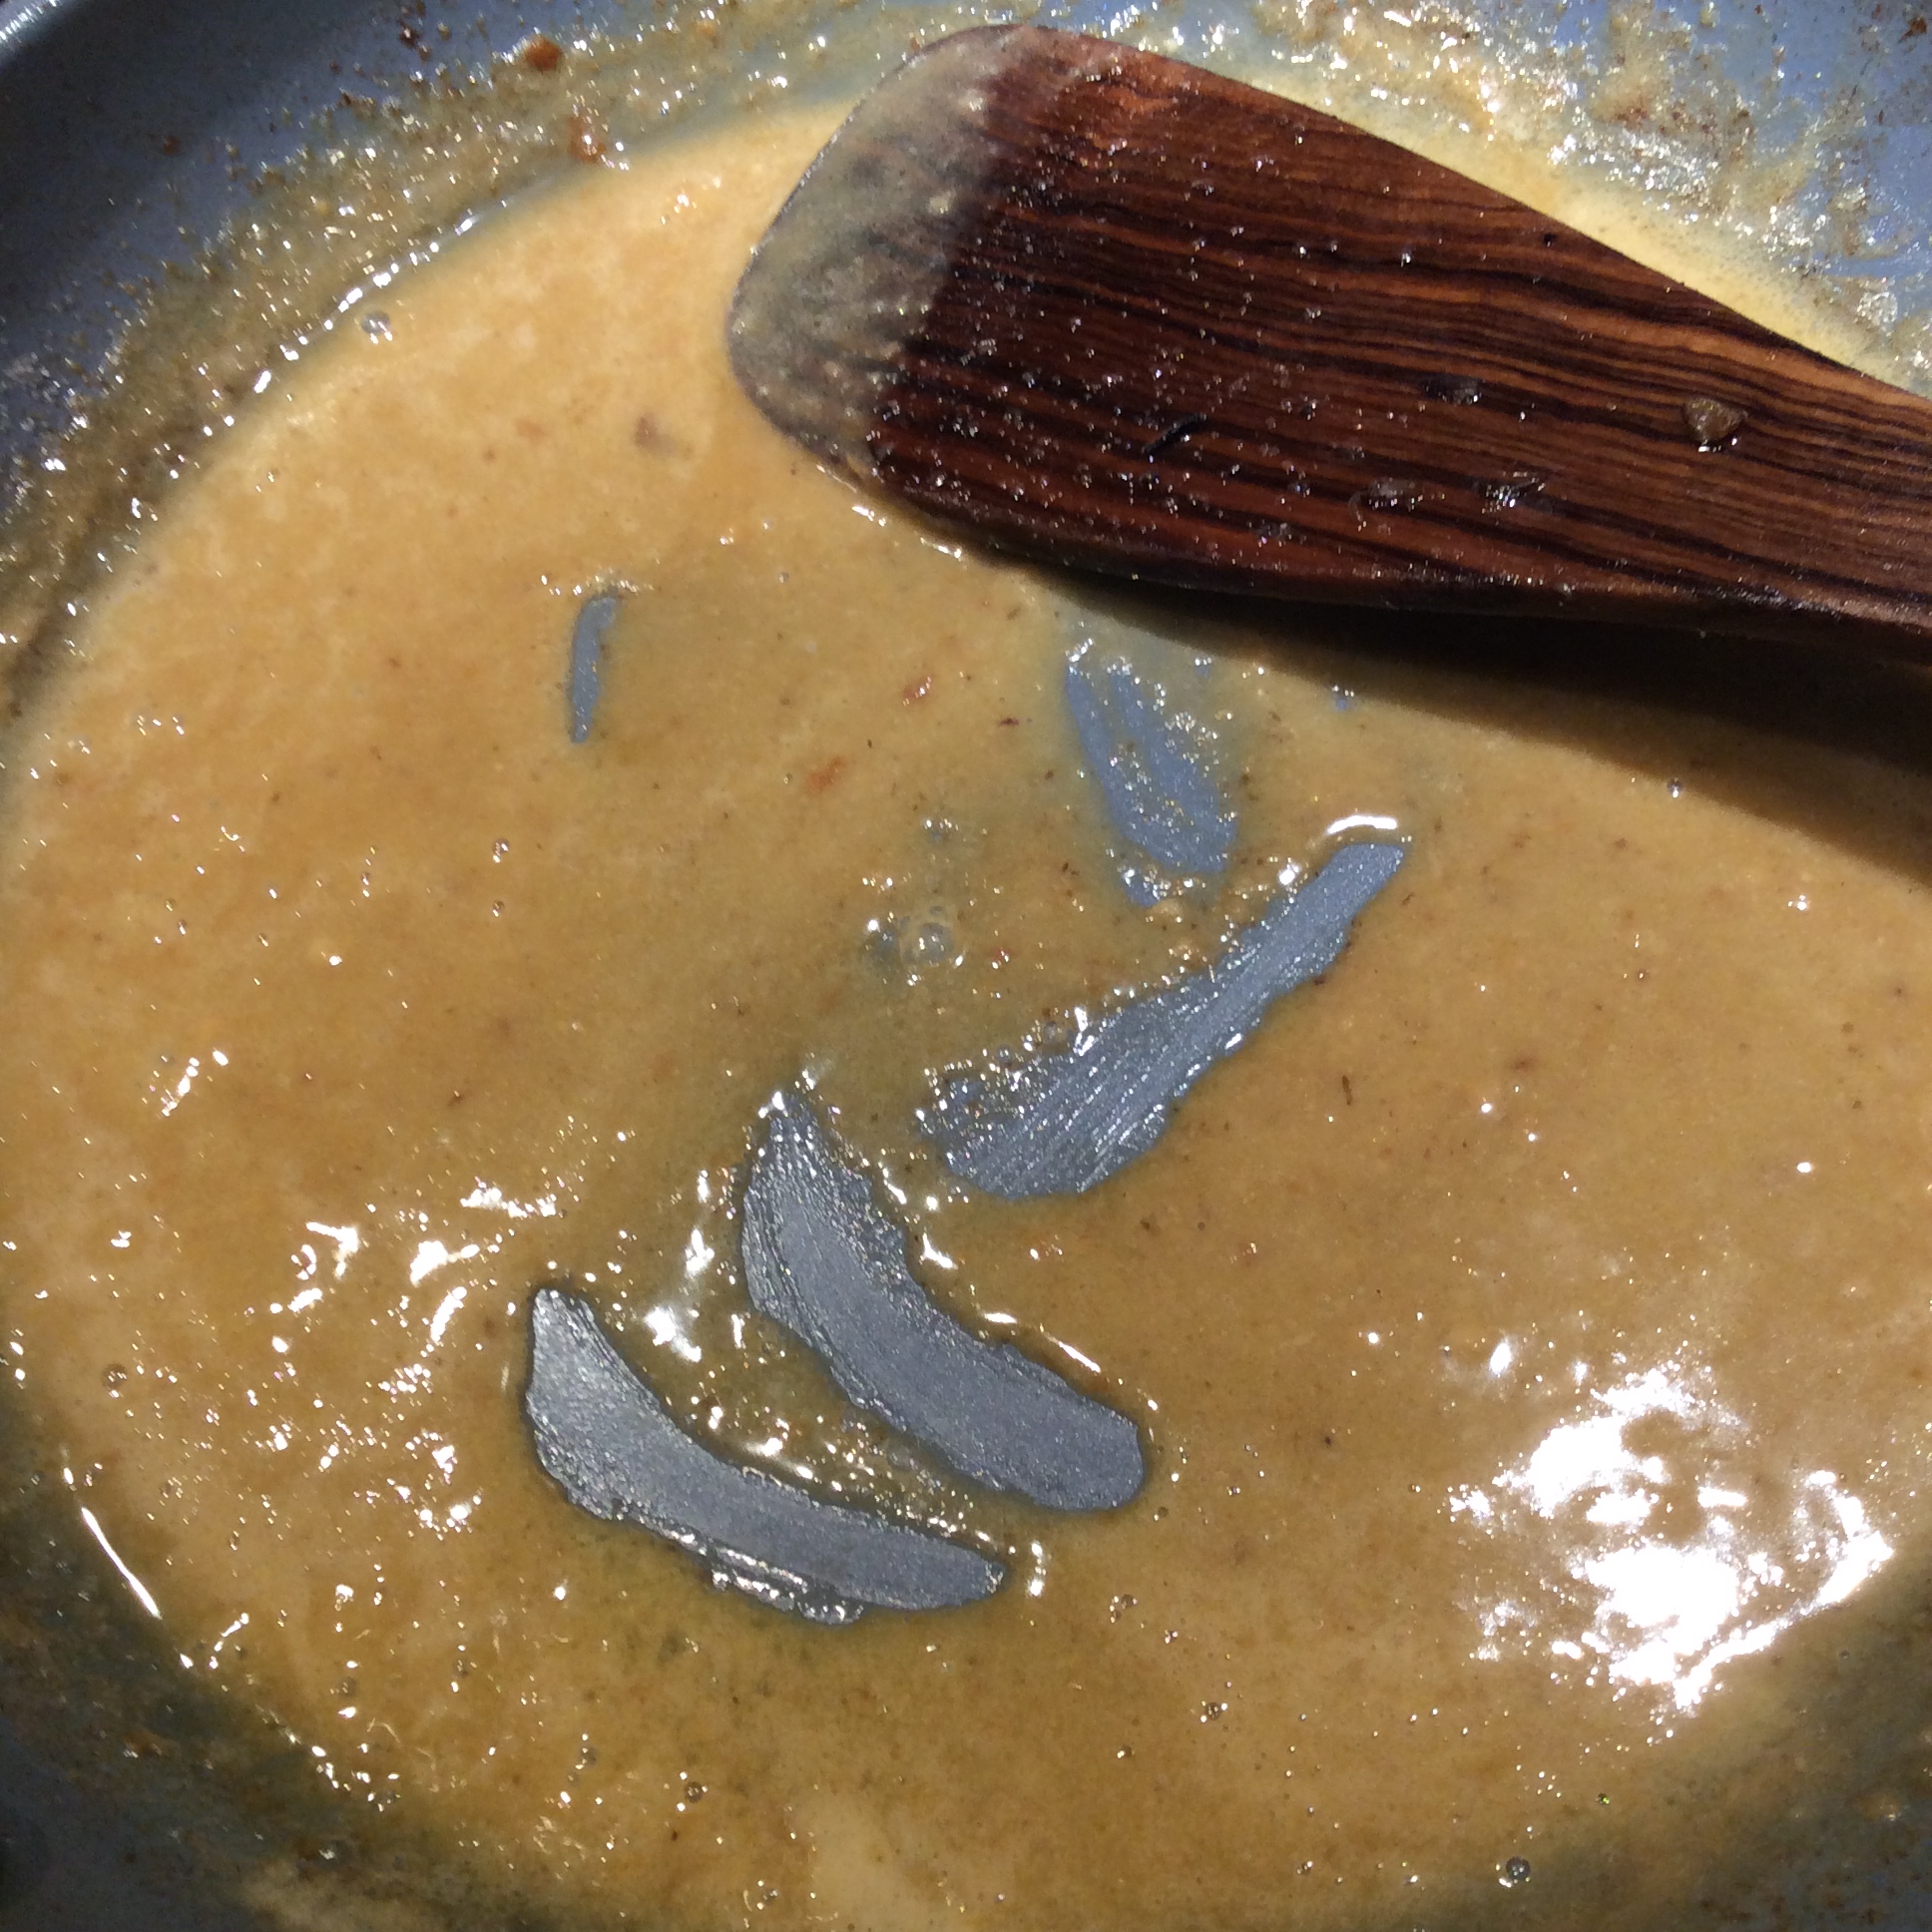
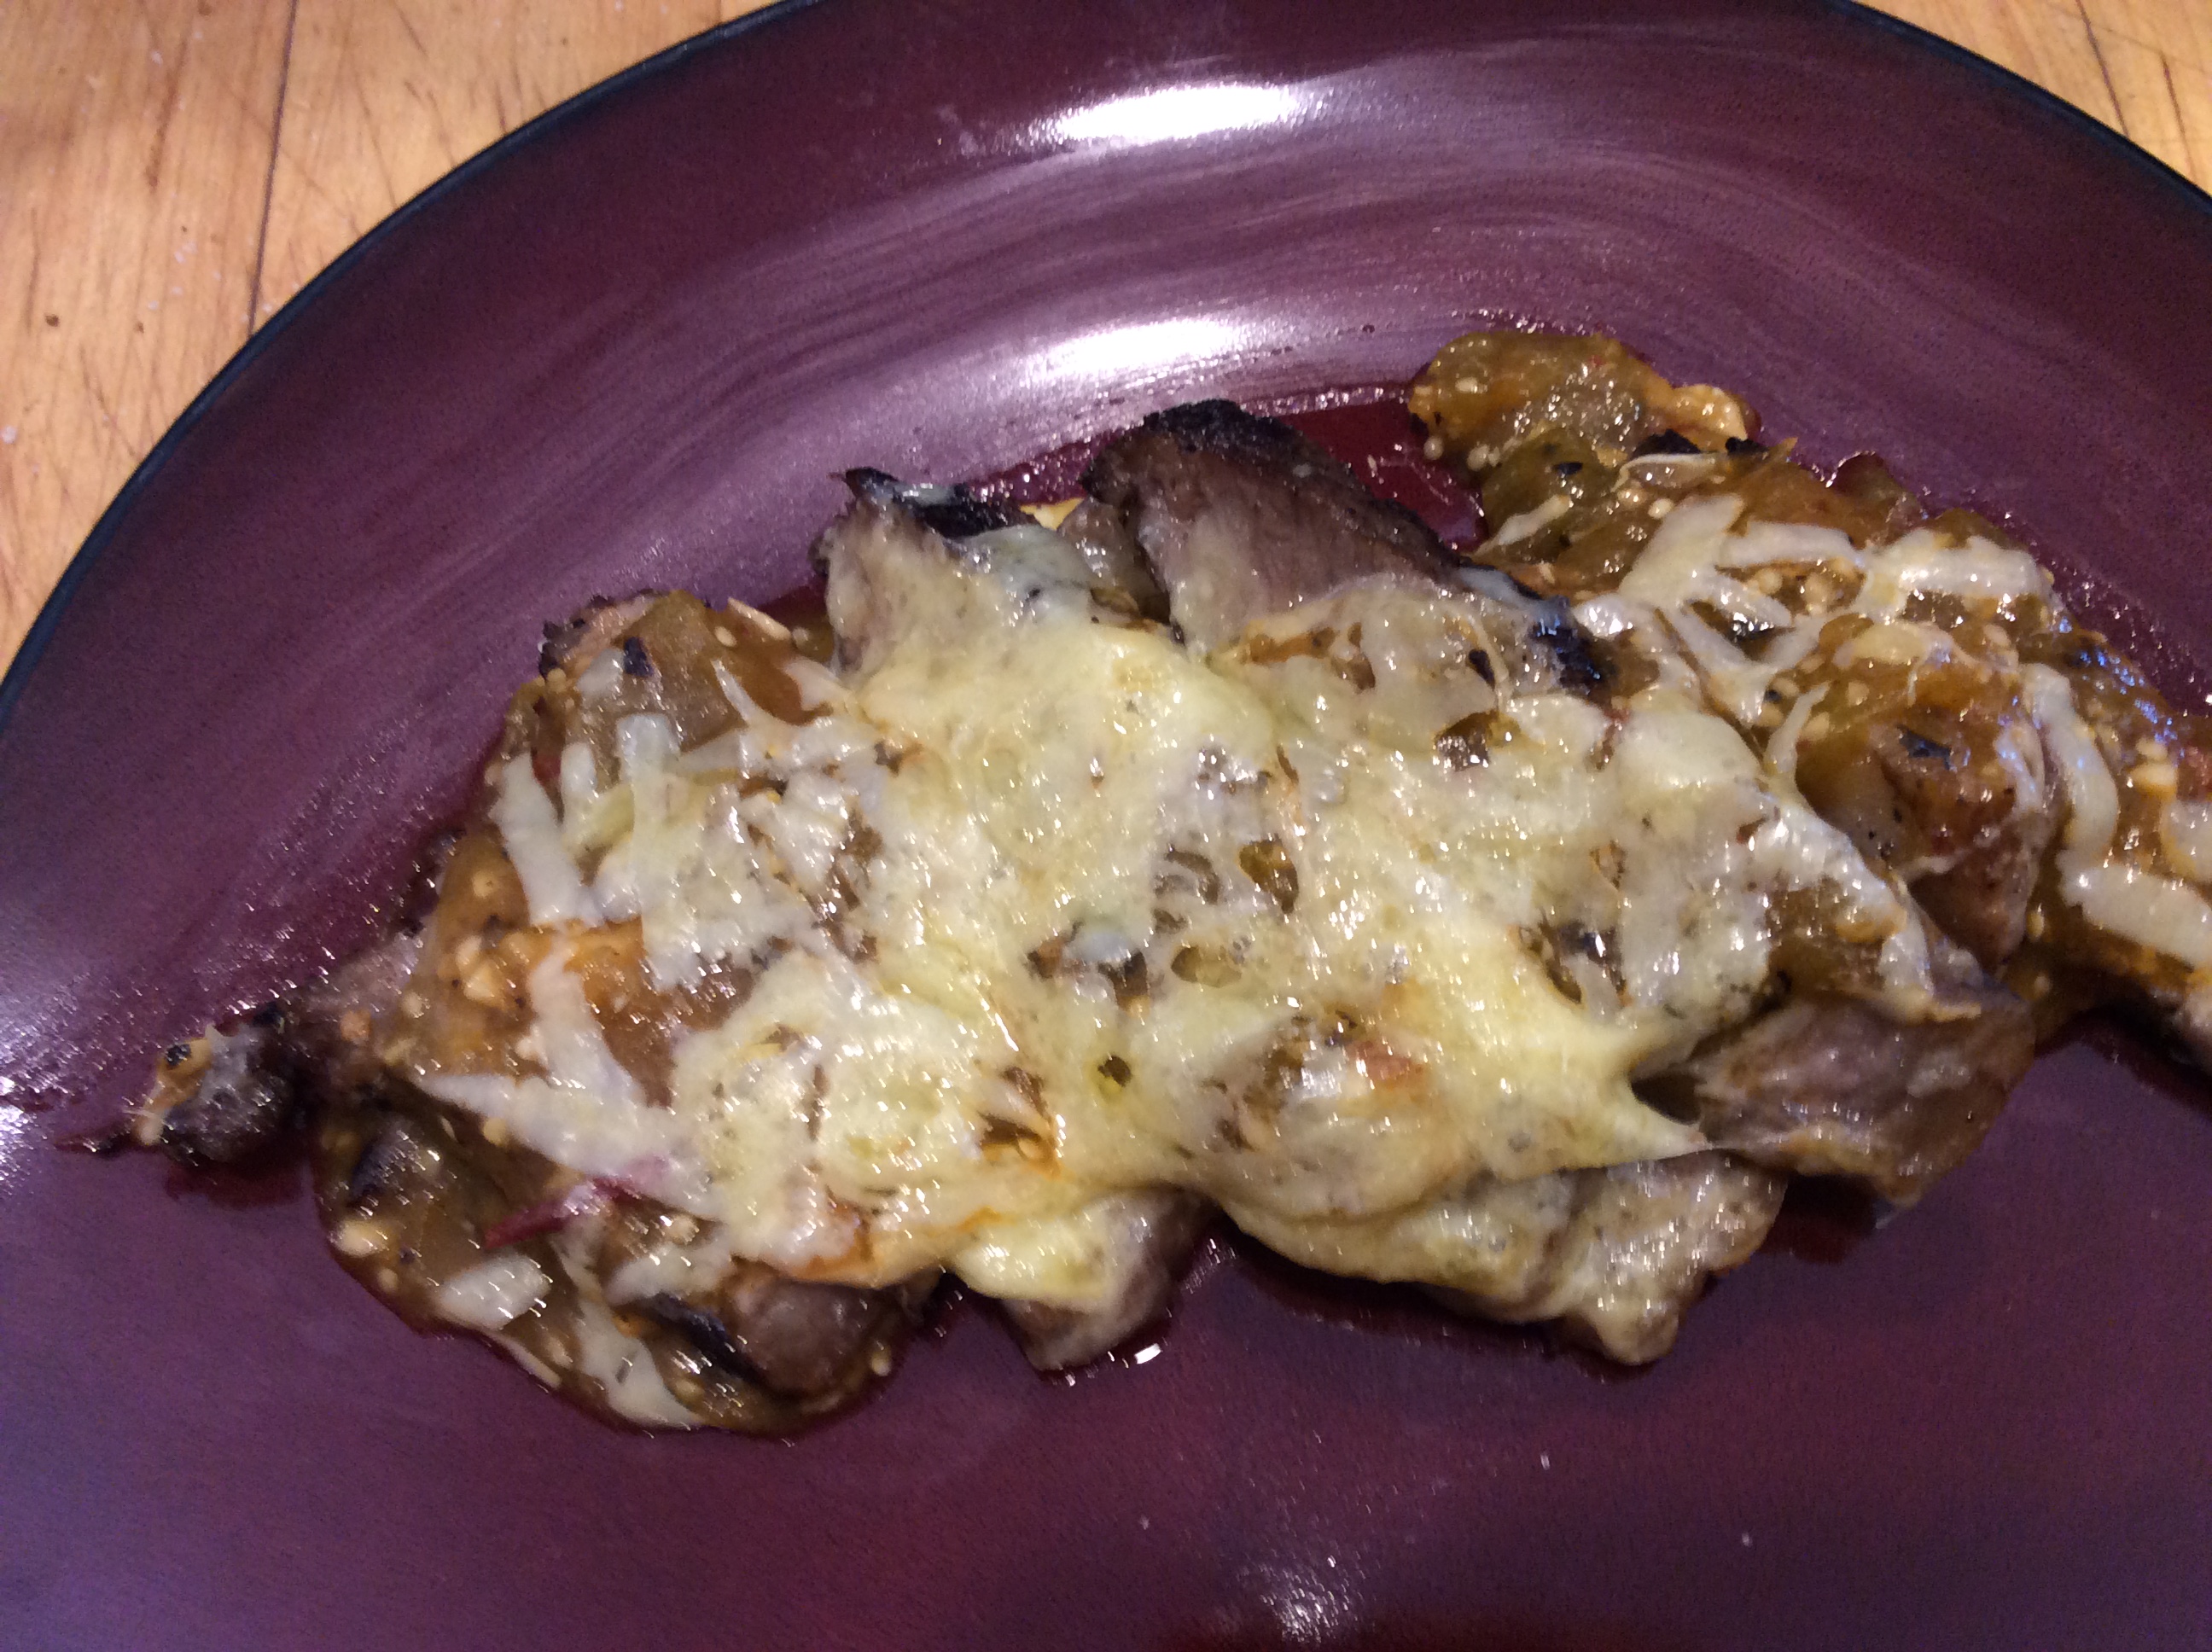
Now comes the fun part. Have some chicken (maybe PerfectSkin Chicken,) and a vegetable but no real union between them? Deglaze the chicken-frying pan with white wine, boil it down hard with a cube of chicken glacé, add half a cup of heavy cream and boil that down hard until it thickens, taste and adjust seasoning. Simple as that. I often like a bit of fresh chopped thyme with chicken, but suit yourself. Below you see a simple pan sauce made this way serving to unite chicken with pan-grilled oyster mushrooms. I like to nap the plate with the sauce rather than pouring it on top, to preserve the exquisite crunch of the skin.
image
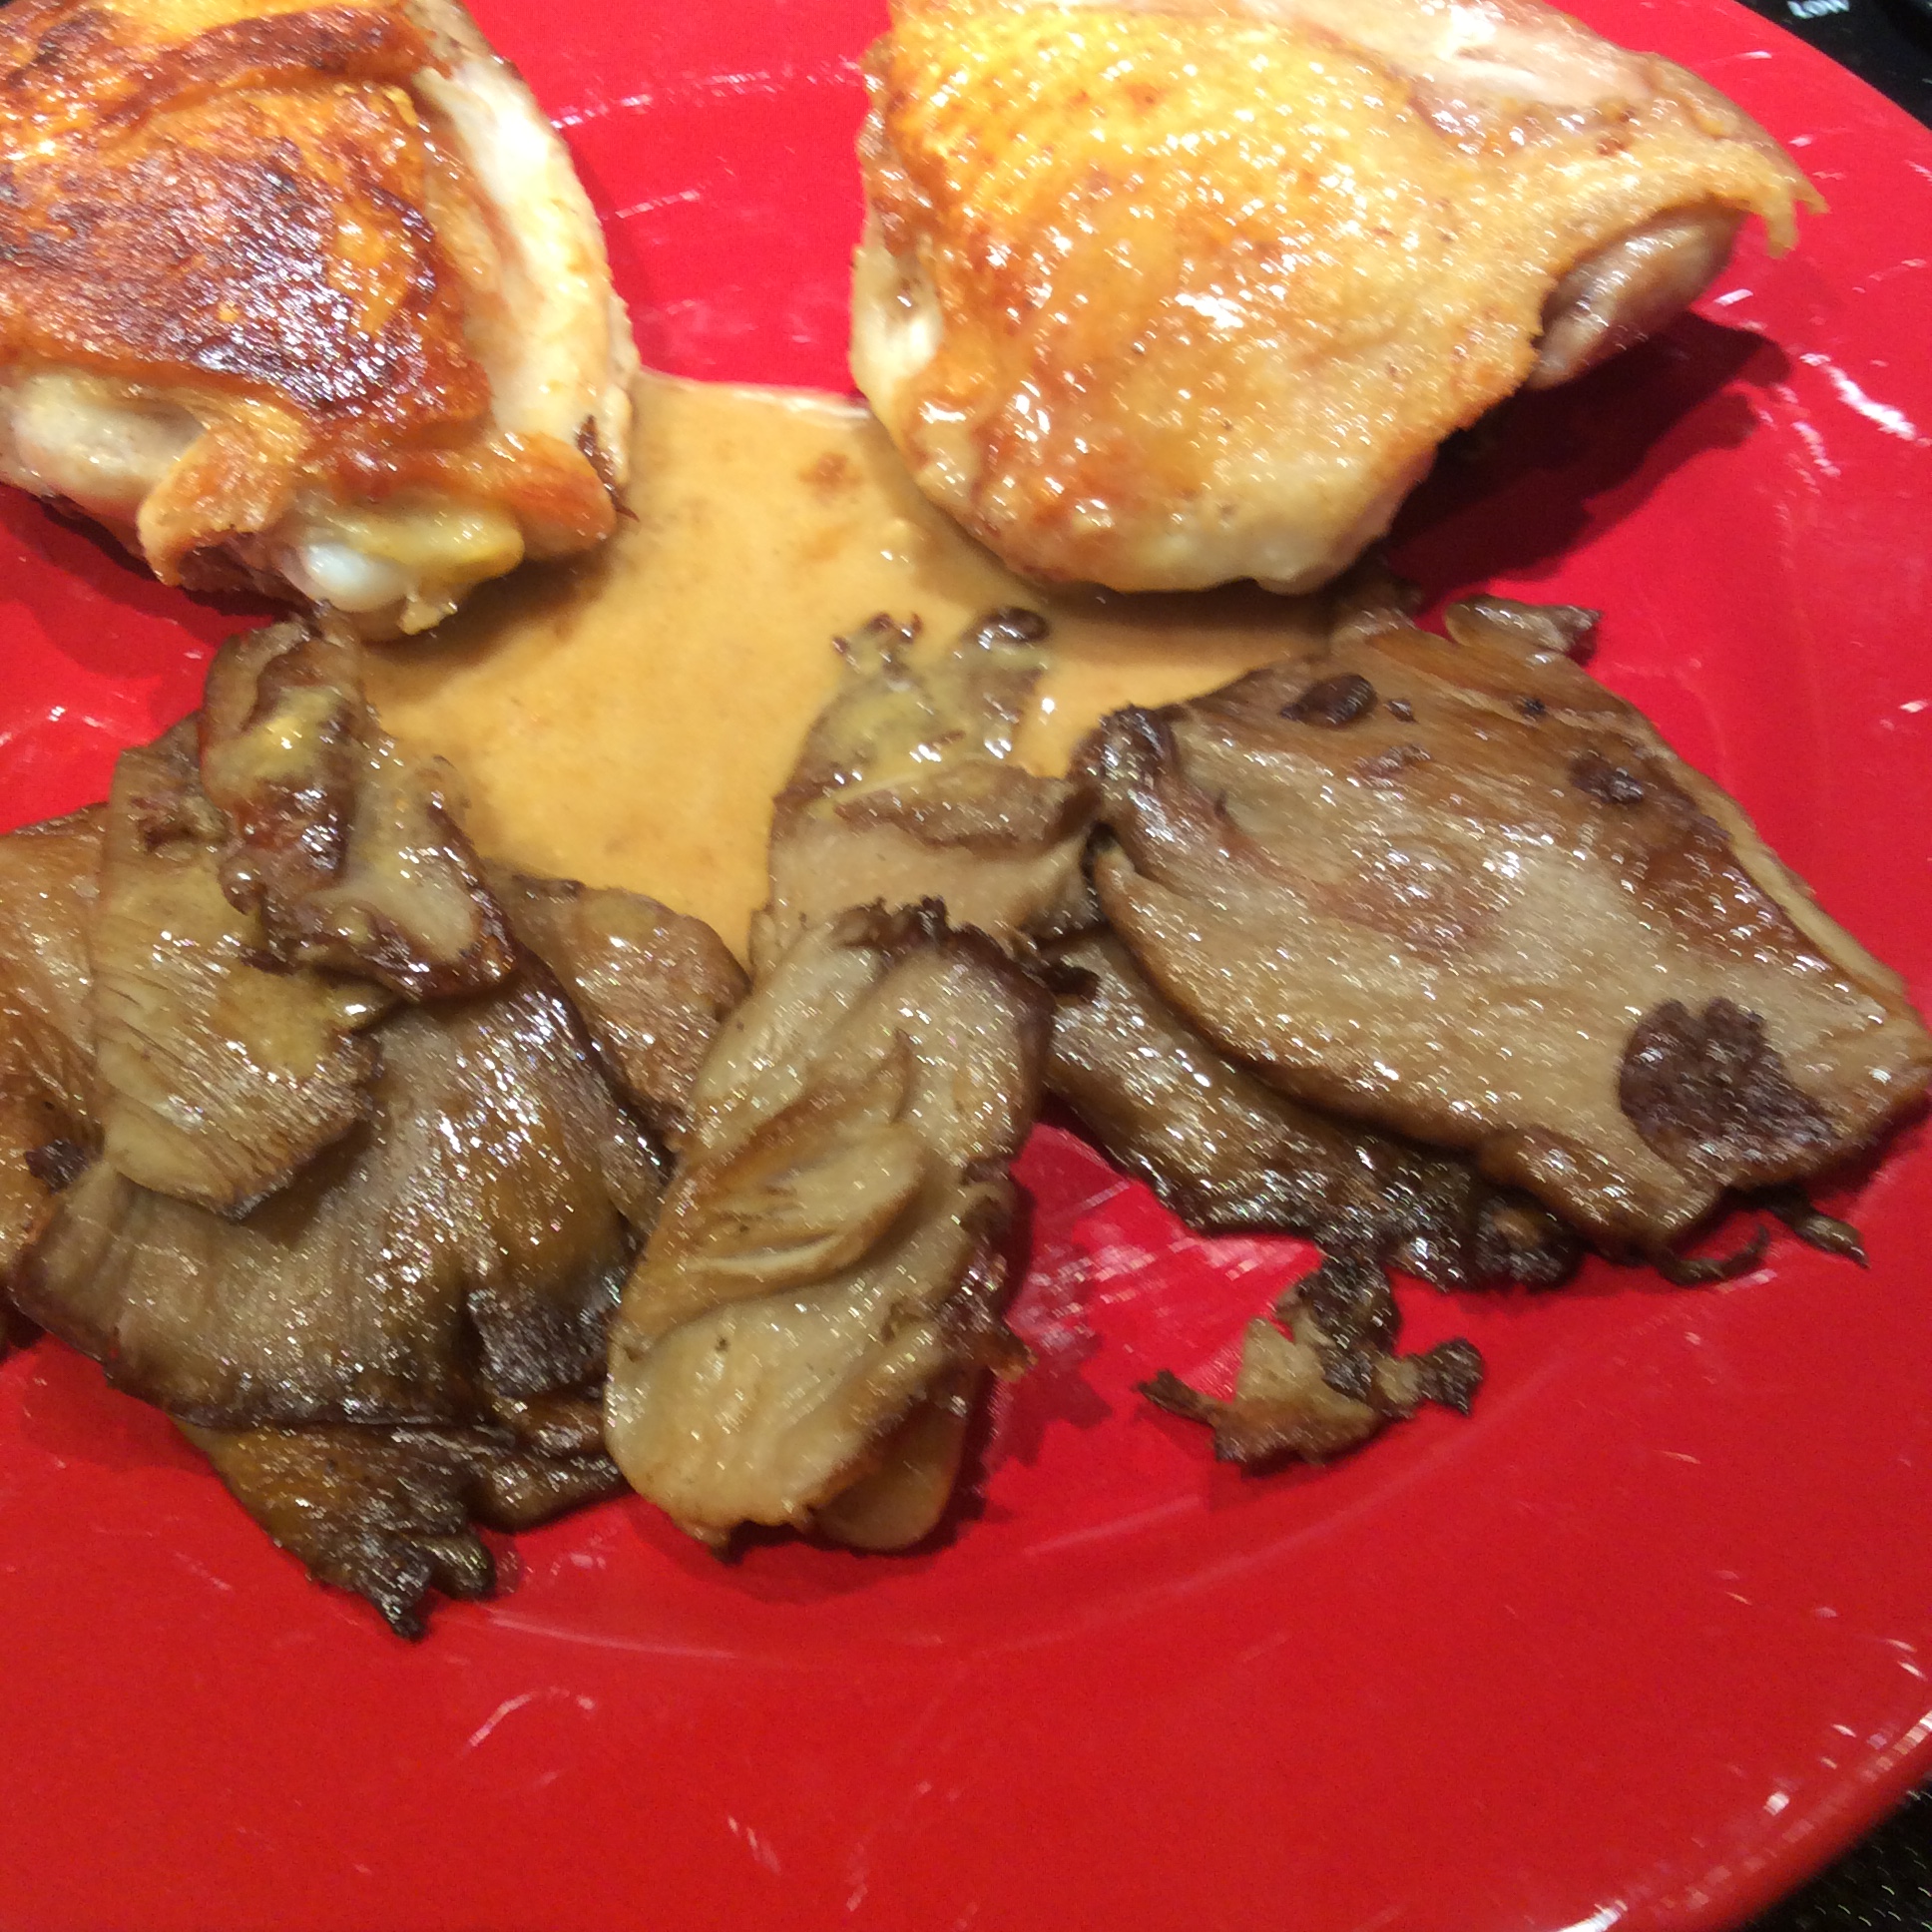
Don’t be afraid to boil your pan sauces briefly but hard; that’s what makes them thicken with no flour. Always swirl in a bit of butter at the end for finesse and polish. Don’t ever take your eyes off them during the boiling-down or disaster may ensue, but it only takes a couple of minutes, while if you had no chicken glacé and used a cup of stock, it would take a lot longer to boil down and wouldn’t be as good. The chicken glacé will thicken the amalgam just enough that your stirring leaves pan bottom exposed for a moment, and that’s perfect.
image

Tomatillos, Salsa, and the Summer Garden

image

The flavor of tomatillos  is one of the wonderful flavors of summer. This is their glory time, when the plants I have stuck into odd corners have tangled themselves throughout the rest of the bed and are making fruits, almost hidden, which are a fascinating mixture of sweet, tangy, and tart when roasted. Right now tomatillos are ripening  in their husks and I can make one of my favorite salsas. This is an old Rick Bayless recipe, modified only slightly, and couldn’t be easier or more full of flavor. Start with about 30 large tomatillos (mine were about 2 inches in diameter) or maybe 50 smaller ones. Remove husks, rinse, and set in a single layer on a baking tray covered with aluminum foil.   Put five cloves of garlic on the baking sheet off to one side where they won’t burn, still in their skins. Broil under high heat until they look cooked on the top and have black spots, turn them over, and broil until that side is cooked.

Image borrowed from no recipes.com

Image borrowed from no recipes.com

Cool a little, skin the garlic cloves, and put the tomatillos and their juices and the garlic in the food processor.  Add at least two canned chilies chipotle in adobo and their associated juice, more if you like it hot. I like 4 large chipotles in this quantity of sauce.  Grind to the degree that you prefer. I like a chunky texture.

image

Now, I add the quintessentially Mexican step of frying the salsa.  In my largest skillet I heat 2 tablespoons of chosen fat, in this case fat from my homemade bacon. When the fat is hot, pour in the pureed salsa. It should sizzle furiously.  Fry it over high heat for a couple of minutes, until it has thickened to the degree that you want.  Salt to taste, and it is ready to use. The frying step smooths and blends the flavors in a delicious way. It’s good hot on grilled or smoked meat, gratineed with cheese, room temp with chips, or any way you like to eat salsa. I especially like the tangy-smoky flavor on grilled vegetables or mixed into cooked greens just before serving, or on top of them with a good sprinkling of Cotija or queso fresco. At the top of the page you see my lunch today, a little piece of leftover steak sliced and broiled with salsa and smoked cheddar on top, a fitting reward for the very minimal labor of making the salsa.

Incidentally, in the past I have grown several different kinds of tomatillos including the small purple ones that are supposed to have a more pronounced flavor, and at least under my growing conditions they all tasted pretty much the same. The small ones  are more tedious to pick and involve a great deal more labor in preparation per unit of finished salsa, and so I grow the biggest ones I can find.

Ricotta, the Easiest Cheese

image

One day when I have loads of leisure and energy, I plan  to get really serious about cheesemaking.   However, if you have a dairy animal or any other source of good milk, there are times when you have milk on hand but no spare time to do anything fancy with it. On those occasions, make ricotta  right away while your milk is fresh. All you need is milk, a large stainless steel pot, a stirring spoon, a strainer, fine cheesecloth, and lemon juice or vinegar. Any child old enough to use the stove at all can make ricotta with a little supervision. Determine approximately how much milk you have and put it in the pot over medium-high heat.  Milk scorches easily, and it should be stirred frequently so that it doesn’t burn on the bottom of the pot.  As soon as the milk foams and is coming to a boil, remove it from the heat and add 2 tablespoons of lemon juice or vinegar per quart of milk.  I don’t recommend cider vinegar or other strong flavored vinegars, and although I prefer lemon juice, I sometimes use rice vinegar, which does not give any off flavor to the cheese.  Stir the acid in and let the pot sit for 5 to 10 minutes. Meanwhile, line the strainer with a few layers of cheesecloth and set it over a bowl it can drain  into, or in the sink, and when the milk in the pot has definitely separated,  pour gently into the cheesecloth lined strainer. Let drain a few hours. Squeeze it a bit in the cheesecloth to get excess whey out,  salt if desired, chill, and eat.  The only reason for the milk not separating is that it wasn’t heated hot enough. If this should happen, heat again, stirring continually, until it separates. But that should not happen if you brought it to a boil in the first place.

The whey is useful and still contains a lot of nutrients.  It would be a shame to waste it. I feed it to my chickens, and they enjoy it.

When I mention cheesecloth I am talking about the real thing, specifically marketed for cheesemaking, and you can get it at New England Cheesemaking Supply along with a variety of other entrancing supplies and gadgets.

Besides just eating the ricotta itself with herbs stirred in, or sweetened and topped with fruit, it makes a good basis for a lot of other delicious meals.  I especially like it as a fill-in for stuffed vegetables. To make the zucchini above, get some good sized zucchini about 10 inches long. Cut them in half and hollow them out into boats.  Sprinkle very liberally with salt and put them in a bowl to drain for at least half an hour. This step is important. Meanwhile, preheat the oven to 450.  When ready to cook the zucchini, dry them off thoroughly with a kitchen towel. Rub with a little olive oil on the inside, put on a parchment lined baking sheet, and put them in the oven until they are fairly tender, which is about 25 minutes for me.

Meanwhile make the filling. Blanch about 2 quarts loosely packed of mixed greens; I used amaranth and lambsquarters. Drain and press the greens dry. Chop them thoroughly.  Chop one onion and two cloves of garlic and sauté them in a quarter cup of olive oil until they are thoroughly cooked but not colored very much. Stir in the chopped greens, and cook all together at least 10 minutes.  Turn the greens mixture into a bowl and mix in a heaping cup of goat ricotta (or any well-drained ricotta) and a cup of grated Parmesan cheese  or crumbled feta. Toss in a handful of chopped herbs. I used about 2 tablespoons of sweet marjoram, a scant tablespoon of winter savory, and a heaping teaspoon of fresh thyme.  Now start tasting the mixture and add salt until you feel the seasoning is perfect.  I like to add a good squeeze of fresh lemon juice at this point as well. Add more herbs if they seem indicated. Once you have the seasoning the way you want it, mix in two raw egg yolks. Pile the mixture  into the cooked zucchini canoes, top with pinenuts and more grated Parmesan, and bake at 400 until they are thoroughly done and the top is just starting to brown.  I like to serve them cooled off a bit, drizzled with a bit of extremely good olive oil.

image


Disaster Preparedness: what do sunchokes have to do with it?

image
Recently somebody checking out my garden over the fence asked if I was a “prepper.” My first response was “No, of course not,” because I don’t care to be associated in any way with the mindset that not-so-secretly longs for the end of civilization. I love civilization.

I do think, though, that a functioning urban homestead is in a good position to survive emergencies. And here’s the thing about emergencies: they happen. My own home state had a potent reminder of this some years back, when Hurricane Katrina broke the levee and New Orleans was flooded. Evacuees poured out of New Orleans and filled surrounding areas, and food and water supples were strained while roads were bumper-to-bumper and accommodations were scarce to nonexistent. All of this came under control with passage of time, but there were some grim weeks for all concerned. It can happen anywhere. Drought, epidemic, loss of power, you name the emergency and a well-supplied urban homestead is well on the way to getting through it and being able to help others. Nobody’s survival is guaranteed, ever. But we can improve the odds.

Urban homesteading is a mindset of reasonable self-sufficiency. I have no ambition to be a nation or a law unto myself. But reasonable forethought about emergency power, medical, water, and food strategies is, in my view, the responsibility of every citizen who has the luxury of a future to look forward to.

With that in mind, I’m keeping some plants around that I have no real desire to eat, and sunchokes (Jerusalem artichokes is another name) are a good example. They are perennial and, as far as I can tell, indestructible. The tubers taste good either raw or cooked. They are loaded with inulin, a prebiotic nondigestible sugar that keeps them from raising blood sugar. The inulin also accounts for their GI effects, including gas for many people and uncomfortable cramping for me. If food were scarce, though, a little cramping would be the least of my worries. More important, if my supply of commercial feed for my livestock were interrupted, they could last a while on weeds and sunchokes, which could be cooked in my solar oven to make them more available to the chickens. The goat could eat the stems and leaves as well as the tubers.
image
Besides their uses in disasters, they make a nice healthy green patch that I don’t have to fool with very much. In my desert area they need some supplemental water but not a lot. They are healthy and vigorous, by which I mean that you can’t kill them, and I confine them to one patch that can be mowed around to foil their plans for world domination.  They don’t play nicely in mixed plantings. The flowers are cheerful and have nectar for bees late in the season. They need to be dug and thinned in the fall. Don’t make any special effort to replant. Plenty will grow from the little bits that you missed. There are a number of different kinds that you can find with some trouble, but I planted a few tubers from the grocery store and they serve well enough.

Here’s an interesting post from Purdue with more details:

https://hort.purdue.edu/newcrop/afcm/jerusart.html