Archive for the ‘edible landscaping’ Category

Admitting What Didn’t Work

image

image
As a gardener/ farmer with a city lot, my rate-limiting step is space, and things that don’t work need to be given up and the space given to something else. This time of year, I’m often busy dealing with things that didn’t work and freeing up their real estate for other purposes.

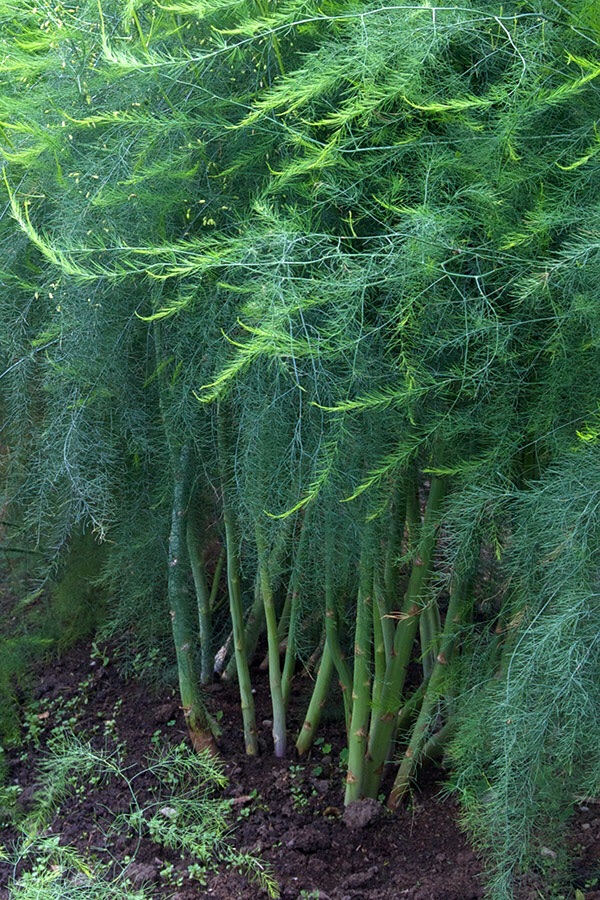
Take my effort to create an asparagus bed with minimal work. The spot where I wanted to establish this long-lived perennial was awful, not to put too fine a point on it. The workers who built the house parked their trucks on it and used it as a dumping spot for leftover cement and other choice debris. The ground was packed hard as concrete, weeds wouldn’t grow there, and it promised hours of backbreaking work.

I decided to use less laborious methods to heal that area, and I planned to take two years to do it. In year 1, I built a long, low compost heap on my future asparagus bed. I used straw and chicken manure, layered it up about two feet high, and it heated well. I ended up with about four inches of pure finished compost over the entire bed, which I left to cool off completely over the winter.

Year 2, I stirred the surface of the compost and planted daikon and oats. The idea was that the oats would provide organic matter and the daikon would pierce and break up the hard pan beneath and make drainage channels through it for the plantings to follow. I supplied water, and the mixture grew well and looked healthy. Again, I left it over the winter to break down.

This year, year 3, I ordered my asparagus starts. On the first warm day in early February, I went out to the bed-to-be with my spading fork, to gloat over the results of my strategy.

What I found was a thin mat of organic matter, bound together by roots, over impenetrable hard stuff. The oats had made a thick mat of roots a few inches thick, and the daikon had turned at right angles when they encountered the hardened mess beneath and grown sideways
along the bottom of the compost.

So, finally, I did what I had to do and double-dug the bed, using a pick to break up the hard conglomerate and incorporating organic matter 18 inches deep. It took an entire back-breaking weekend. Now my bed is mellowing, ready for the asparagus roots to be planted in March.

Does this mean that labor-saving methods of gardening don’t work? No, it just means that everything depends on the situation. Study your situation, and be aware that some areas can’t be repaired without putting in a lot of sweat equity. Is it worth it? If you want fresh food and want to leave a piece of land better than you found it, the answer is an emphatic “yes.”

The Seeds You Need

image

Here in the high-desert Southwest, our cold-weather vegetables need to be planted by mid-March, and so late February is my last good chance to review my seed box and order what I need. This resulted in my sending off a frantic order for sugar snap peas. My attachment to them is strong, largely because I love English (shelling) peas but never find time to shell them. My favorite snap pea is the original Sugar Snap. This variety has some disadvantages: it climbs 5-6 feet and has to be provided with support, the pods have strings and need to be de-stringed before cooking, and it doesn’t have much in the way of disease resistance (although I have had no problems with disease.) It has a single incomparable advantage: flavor that none of the newer, neater varietals can live up to. For best flavor, the peas inside the pod have to be allowed to develop. Don’t pick them in the flat snow-pea stage. Then rinse and string the pods, which is a very quick job, and steam them to eat with butter, stir-fry with some scallion and ginger, or cook them in your own favorite way. Yum.

In my opinion they develop a soapy taste when frozen, so I don’t recommend “putting them by.” Eat mountains of the fresh article and give any extra to people you really like.
The important thing is, order those seeds now.

And don’t forget to plant extra so that you can cut pea shoots. Cut when they are 6-8 inches high, pea shoots are delicious in salads and stir-fries.

Welcome back, and notes on the Ketogenic diet

image

I’ve been MIA for a long time, and I appreciate the kindness of those readers who tactfully enquired about my whereabouts. The main reason was a series of deaths among my nearest and dearest that made 2013-14 seem like The Years That Everybody Died. Change and death are inevitable, and so are grief and railing against fate. Many thanks to those of you who are still with me.

Another change had a happier outcome. I developed clear signs and lab results indicating that the inexorable progression to type 2 diabetes had begun, and this started me wondering whether it really was inexorable. The answer, almost three years later, is an enthusiastic “No way!” After fooling around with various unsuccessful interventions, I finally took the plunge and went on an ultra low carbohydrate (ketogenic) diet, and after the first awful month of withdrawing from all my beloved toxins, it’s been great. Good energy, bubbling good health, and freedom from food cravings don’t come from medications, they come from consciously made lifestyle choices. Even more than I thought before, we choose our health. My menu of food choices includes meat, poultry, fish, seafood, green vegetables and some others, mushrooms, cheese, cream, strained yogurt, coconut milk, and nuts. Plenty to choose from, and plenty to season it with.

So some of my recipes will be a little different now, but the role of home food production is even more important than before. Green vegetables are an even bigger part of my diet now, and I want the best deep-organic stuff that I can get. Good meats are vital, and I produce my own where I reasonably can. I probably couldn’t afford to buy foods of this quality in the amounts that I eat them. This is the perfect time of year to plan your season of growing and foraging, so in the next post we’ll start thinking about what to grow and what to read.
image

Oh, and don’t forget:

image

How to love Your Carrots


I’m doing a blog series for our local newspaper this month, but some readers had trouble accessing those posts, so I decided to put them on my own blog as well. Here’s the third one:
Eating seasonally is a pleasure for most of the year, and fall is a wonderful time to eat carrots. We all know how healthy carrots are, so I’ll skip over that part and concentrate on how delicious they are. When I cook carrots I make a lot, because they are wonderful for at-your-desk lunching the next day. Usually I retrieve my lunch from the refrigerator at my mid-morning brief break and eat it at room temperature at lunchtime, as long as no egg yolks, mayonnaise, or other extreme perishables are involved. If I plan to eat them at room temperature for lunch I use olive oil instead of butter, since animal fats congeal unattractively when they aren’t hot, but if you prefer to use butter, no problem. Just heat your carrots a little the next day, then carry them back to your desk and eat happily, with the slightly smug glow that comes of doing the right and healthy thing and getting your work done at the same time.

First, catch your carrots. Real carrots come in bunches with the tops on, and if the tops look withered, don’t bother with those carrots. Get some fresh ones instead. Your nearest growers’ market is a great place to shop for them. Here in Albuquerque you can find several colors, including yellow, the standard orange, red, and a glowing royal-purple. I love the purple ones, but any of these techniques can be used for any carrot.

I use the word “technique” with forethought, because it is basic technique that makes it quick and easy to cook and eat lots of vegetables. If you have to read a recipe in the kitchen as you work, you will eventually get fed up, but technique lives in your brain and makes it a snap to blanch, saute’, stir-fry, bake, boil, or grill any veggie that you care to eat. No precise measurements are needed. So here are a couple of basic techniques for carrots:

Blanch, then saute’: trim and scrub four large carrots or six smaller ones of any color. Peel if needed (usually I scrub well with a brush instead.) Slice into slices about a quarter inch thick. Fill a large saucepan with about 2 quarts of water, add 2 teaspoons of salt, bring to a boil, toss in the carrots, boil 5 minutes, and drain thoroughly. If you want to, you can hold the drained carrots at room temperature for 2-3 ours, making it easy to do some work ahead of time if needed. Melt two tablespoons of butter in a frying pan, or use olive oil if you prefer. Put in the carrots, 2-3 teaspoons of honey, salt to taste, and a grating of fresh nutmeg. Saute’ over medium heat until the carrots are done to your liking, and serve. The blanching makes sure that the carrots cook evenly, and the saute’ing brings out their flavor. You can vary this infinitely: add herbs in the saute’ stage; thyme or savory are especially good with carrots. Chop a clove of garlic or half a small onion and cook in the butter or oil until just cooked through before adding the carrots. Use a tablespoon of balsamic vinegar instead of honey. Add a squeeze of fresh lemon juice for a very fresh flavor. Add half a teaspoon of grated orange rind with the honey. Add a tablespoon or two of dark rum and cook it off thoroughly before serving. Or, if you have access to some good artisanal root beer (I brew my own. Just don’t use the grocery-store glop) you can add a quarter cup of it when you add the carrots to the butter, and cook over high heat until the root beer is reduced to a syrup that just coats the carrots. A quarter-cup of dark ale produces a malty, ever-so-faintly bitter glaze that’s great with game. You can also cut the carrots into chunks about 2 inches long and then cut those into quarters at the initial prep, for a different texture. When using orange carrots, sometimes I cook a couple of purple potates separaely, slice them, and add them in for the saute’ stage.

Grilling: Usually people don’t think of grilling carrots, which is a shame, because the caramelization around the edges is delicious. Just cut them thinly. I like slices about 1/8” thick. Use a griddle or grill-wok so they don’t fall through the grill, and watch them closely so that they don’t burn. I describe a Southeast Asian seasoning here, but again the technique is key, and once you get the hang of it, you can season them any way you like. Trim and scrub 3-4 large carrots of any color, and slice them thinly. Toss with two chopped cloves of garlic, a 1” chunk of ginger grated, a tablespoon of Asian fish sauce (you can use soy sauce instead if you insist,) a tablespoon of agave nectar or coconut sugar, and 2 tablespoons of canola oil or similar. Heat the grill to medium-high and spread the carrot slices out on the griddle section or put them in the grill-wok. If griddling them, turn them in bunches with a spatula about halfway through. If using the wok, you will need to turn several times during cooking. Taste to see when the texture seems just right to you, salt a little if they need it (the fish sauce is fairly salty) and serve with some chopped cilantro on top.